
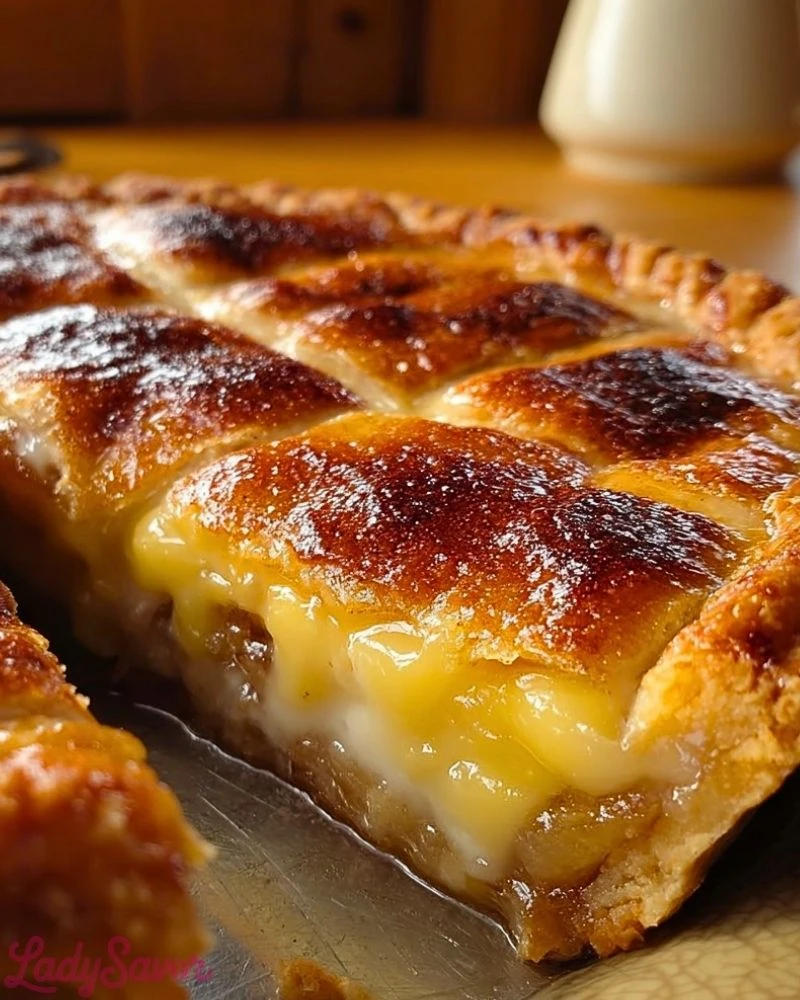
Hillbilly Pie is the kind of dessert that feels like it belongs on a sunlit kitchen table, surrounded by laughter and second helpings. With its golden, slightly crisp crust and a soft, custard-like center, every bite delivers a comforting blend of sweetness and warmth. The rich filling melts gently into the crust, creating a texture that’s both creamy and satisfyingly dense.
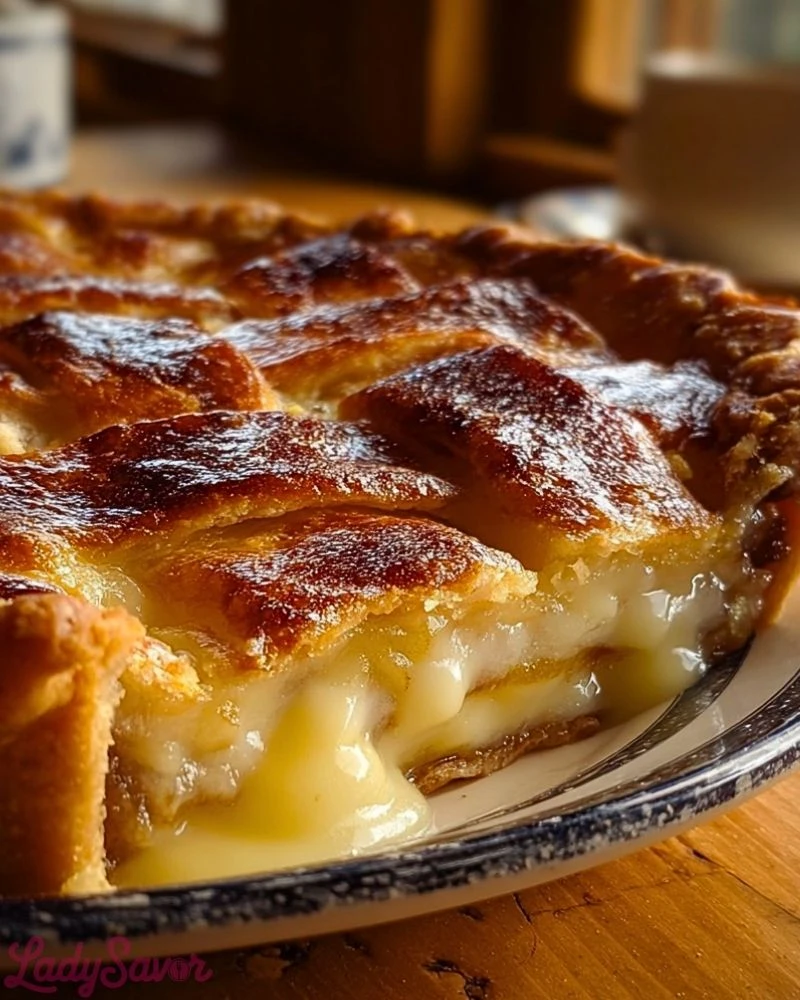
This pie carries a nostalgic charm, often reminding people of homemade treats passed down through generations. The light drizzle of icing over the top adds just the right touch of sweetness, balancing the flavors without overpowering them. Whether served warm or chilled, it’s a dessert that effortlessly brings a sense of home to any gathering.
Why You’ll Love This Hillbilly Pie
You’ll find yourself coming back to this Hillbilly Pie for its simplicity and comforting flavor profile. It’s easy to prepare with basic pantry ingredients, yet it tastes like something truly special. The contrast between the soft interior and slightly crisp top creates a delightful texture, while the subtle sweetness makes it perfect for any occasion—from casual family dinners to festive celebrations.
Preparation Phase & Tools to Use (Essential Tools and Equipment, and Their Importance)
To make Hillbilly Pie successfully, having the right tools makes a noticeable difference. A mixing bowl is essential for combining ingredients smoothly, ensuring a lump-free filling. A whisk helps incorporate air and blend everything evenly, which contributes to the pie’s creamy texture. A measuring cup and spoons are crucial for accuracy, preventing the filling from becoming too runny or too dense.
A pie dish is, of course, the foundation of the recipe—it shapes the pie and ensures even baking. Using an oven with consistent temperature control is key to achieving that golden top and perfectly set center. Lastly, a cooling rack allows the pie to settle properly after baking, helping the filling firm up while maintaining its creamy consistency.
Preparation Tips
For the best results, make sure all your ingredients are at room temperature before you begin, as this helps them blend more smoothly and evenly. Avoid overmixing the batter, since that can introduce too much air and affect the final texture. Keep an eye on the baking time—Hillbilly Pie should have a slightly jiggly center when you take it out, as it will continue to set while cooling. Letting it rest before slicing is essential to achieve clean cuts and the perfect custard-like consistency.
Ingredients for this Hillbilly Pie
To build the signature creamy center and lightly crisp, golden top, gather the following ingredients. Each one plays a role in achieving the classic texture and flavor:
- 1 unbaked pie crust (store-bought or homemade)
- 1/2 cup (1 stick) unsalted butter, melted and slightly cooled
- 1 cup granulated sugar
- 2 large eggs, room temperature
- 1 tablespoon all-purpose flour
- 1 cup buttermilk (or whole milk with 1 tablespoon lemon juice as a substitute)
- 1 teaspoon pure vanilla extract
- 1/4 teaspoon salt
- 1/2 teaspoon ground cinnamon (optional, for warmth)
- 1/4 teaspoon freshly grated nutmeg (optional, enhances depth)
For the glaze (optional but recommended):
- 1 cup powdered sugar
- 2–3 tablespoons milk or cream
- 1/2 teaspoon vanilla extract
Optional add-ins for variation:
- 1/2 cup shredded coconut (for a chewy texture)
- 1/3 cup chopped pecans or walnuts (for crunch)
- 1/4 cup brown sugar (for a deeper caramel note)
Instructions for this Hillbilly Pie
Step 1: Prepare the Oven and Crust
Preheat your oven to 350°F (175°C). Place your unbaked pie crust into a 9-inch pie dish, gently pressing it into the edges. Crimp the edges as desired for a rustic look. If the crust feels too soft, chill it in the refrigerator for 10–15 minutes to help it hold its shape during baking.
Step 2: Melt and Cool the Butter
Melt the butter in a small saucepan over low heat or in the microwave in short intervals. Allow it to cool slightly—hot butter can scramble the eggs when mixed too quickly.
Step 3: Whisk the Eggs and Sugar
In a large mixing bowl, whisk together the eggs and granulated sugar until the mixture becomes pale and slightly thickened. This step helps dissolve the sugar and contributes to a smoother filling.
Step 4: Combine the Wet Ingredients
Slowly pour the melted butter into the egg mixture while whisking continuously. Add the buttermilk and vanilla extract, mixing until fully incorporated and smooth.
Step 5: Add Dry Ingredients
Sprinkle in the flour, salt, cinnamon, and nutmeg (if using). Whisk gently until no lumps remain. Avoid overmixing—just combine until the batter is uniform and silky.
Step 6: Customize the Filling (Optional)
If you’re adding coconut, nuts, or brown sugar, fold them into the batter at this stage. These additions create delightful texture contrasts and deepen the flavor profile.
Step 7: Fill the Pie Crust
Carefully pour the prepared filling into the pie crust. The mixture will be quite liquid—this is normal and what creates the custard-like interior during baking.
Step 8: Bake to Perfection
Place the pie on the center rack of the oven. Bake for 45–55 minutes, or until the top is golden brown and the edges are set. The center should still have a slight jiggle when gently shaken.
Step 9: Cool and Set
Remove the pie from the oven and transfer it to a cooling rack. Let it cool for at least 2 hours. This resting time allows the filling to fully set into its signature creamy texture.
Step 10: Prepare the Glaze (Optional)
In a small bowl, whisk together powdered sugar, milk or cream, and vanilla extract until smooth. Adjust consistency as needed—thicker for a drizzle, thinner for a light coating.
Step 11: Finish and Serve
Drizzle the glaze over the cooled pie. Slice and serve at room temperature or slightly chilled. For an extra treat, pair with whipped cream or a scoop of vanilla ice cream.
Notes for this Hillbilly Pie
Hillbilly Pie is wonderfully forgiving, which makes it ideal for both beginners and experienced bakers. The filling may look thin before baking, but it transforms into a rich, custard-like center as it cooks. The top develops a lightly crisp, golden layer that contrasts beautifully with the creamy interior. If you prefer a sweeter finish, the glaze is a great addition, but the pie is just as delicious without it. Subtle spice additions like cinnamon and nutmeg can be adjusted to your taste, or omitted entirely for a more classic flavor.
Watch Out for These Mistakes While Cooking Hillbilly Pie
- Overbaking the pie: This can lead to a dry texture instead of a creamy center. Always remove it when the middle still has a slight jiggle.
- Using cold ingredients: Cold eggs or milk can prevent the filling from blending smoothly, affecting the final texture.
- Skipping the cooling time: Cutting too early will cause the filling to collapse and become runny.
- Overmixing the batter: This can incorporate too much air and result in an uneven texture.
- Not protecting the crust edges: If they brown too quickly, cover them lightly with foil during baking.
Storage Instructions for Hillbilly Pie
Once completely cooled, cover the pie loosely with plastic wrap or foil and store it in the refrigerator. It will keep well for up to 3–4 days. For best texture, allow slices to sit at room temperature for about 15–20 minutes before serving. You can also freeze the pie by wrapping it tightly in plastic wrap and then foil; it will last up to 2 months. Thaw overnight in the refrigerator before serving.
Estimated Nutrition
Per slice (based on 8 servings, approximate values):
- Calories: 320–360 kcal
- Carbohydrates: 40–45g
- Protein: 4–6g
- Fat: 16–20g
- Saturated Fat: 9–11g
- Sugar: 25–30g
- Sodium: 150–220mg
Frequently Asked Questions about Hillbilly Pie
1. What makes Hillbilly Pie unique?
Its custard-like filling forms naturally during baking, creating a layered texture without complicated steps.
2. Can I use regular milk instead of buttermilk?
Yes, you can substitute with whole milk and add a bit of lemon juice or vinegar to mimic buttermilk.
3. How do I know when the pie is done?
The edges should be set and golden, while the center remains slightly jiggly.
4. Can I make this pie ahead of time?
Absolutely. It actually tastes even better after resting, making it perfect for preparing a day in advance.
5. Is it necessary to add the glaze?
No, the glaze is optional. The pie is flavorful enough on its own.
6. Can I add fruits to this recipe?
Yes, berries or sliced peaches can be added, but be mindful of extra moisture.
7. Why did my pie turn out too runny?
It may not have baked long enough or wasn’t given enough time to cool and set.
8. Can I use a store-bought crust?
Yes, store-bought crust works perfectly and saves time without compromising flavor.
Conclusion
Hillbilly Pie is a timeless dessert that combines simplicity with rich, comforting flavors. Its easy preparation and satisfying texture make it a go-to recipe for gatherings, holidays, or just a cozy treat at home. With a few basic ingredients and a little patience, you can create a pie that feels both nostalgic and indulgent, sure to become a favorite in your kitchen.
Hillbilly Pie
- Total Time: 65 minutes
- Yield: 8 servings 1x
- Diet: Vegetarian
Description
Get ready to fall in love with this rich and comforting Hillbilly Pie—a perfect blend of creamy custard filling and a golden, slightly crisp top. This easy recipe is perfect for quick dessert ideas, family gatherings, and homemade baking lovers.
Ingredients
1 unbaked pie crust
1/2 cup unsalted butter melted
1 cup granulated sugar
2 large eggs
1 tablespoon all-purpose flour
1 cup buttermilk
1 teaspoon vanilla extract
1/4 teaspoon salt
1/2 teaspoon ground cinnamon optional
1/4 teaspoon nutmeg optional
1 cup powdered sugar
2 tablespoons milk or cream
1/2 teaspoon vanilla extract
Instructions
1. Preheat oven to 350°F (175°C) and prepare pie crust
2. Melt butter and let it cool slightly
3. Whisk eggs and sugar until smooth
4. Add butter slowly while mixing
5. Stir in buttermilk and vanilla
6. Add dry ingredients and mix until smooth
7. Pour filling into crust
8. Bake 45–55 minutes until golden
9. Cool completely before serving
10. Prepare glaze and drizzle on top
Notes
Use room temperature ingredients for best texture
Avoid overbaking to maintain creamy center
Let pie cool fully before slicing
- Prep Time: 15 minutes
- Cook Time: 50 minutes
- Category: Dessert
- Method: Baking
- Cuisine: American
Nutrition
- Serving Size: 1 slice
- Calories: 340
- Sugar: 28g
- Sodium: 180mg
- Fat: 18g
- Saturated Fat: 10g
- Unsaturated Fat: 6g
- Trans Fat: 0g
- Carbohydrates: 42g
- Fiber: 1g
- Protein: 5g
- Cholesterol: 85mg