

I still remember the first time I pulled a tray of these Cheesy Taco Sticks out of the oven. The golden crust, gooey melted cheese, and the sizzling scent of seasoned beef made the whole kitchen smell like a cozy Tex-Mex fiesta. I made them on a whim, hoping to please a picky bunch, but they disappeared faster than I could blink. Since then, these taco sticks have become my go-to snack for game nights, casual dinners, and everything in between.
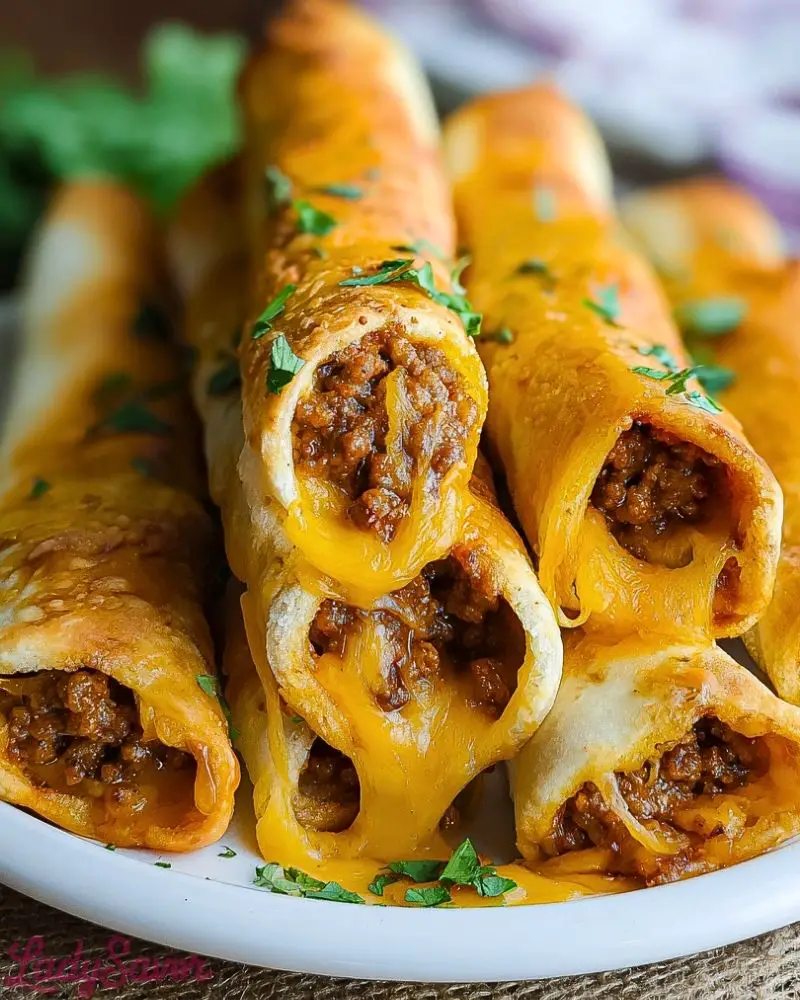
They strike that perfect balance between indulgent and easy. Wrapped in soft dough, packed with savory taco meat, and layered with melty cheese, these handheld delights are everything I love in comfort food—portable, satisfying, and crowd-pleasing. Whether you’re cooking for kids or adults, Cheesy Taco Sticks always get devoured.
Why You’ll Love This Cheesy Taco Sticks Recipe
These Cheesy Taco Sticks are more than just a snack—they’re a guaranteed hit. Here’s why you’re going to want to make them over and over again:
- They’re incredibly easy to assemble, especially if you use store-bought dough.
- You can customize the filling with your favorite taco toppings or proteins.
- The outside is crisp and golden while the inside stays cheesy and saucy.
- They freeze well, making them a perfect make-ahead meal or snack.
- Kids and adults both love them, and they’re ideal for lunchboxes, parties, or casual dinners.
What Kind of Dough Should I Use for Cheesy Taco Sticks?
You’ve got a few options when it comes to the dough, and it really depends on how much time and effort you want to put in. I usually go with refrigerated pizza dough or crescent roll dough because it’s quick and dependable—it bakes up golden and flaky with minimal prep. If you’re aiming for a more homemade touch, you can use your favorite pizza dough recipe or even a yeasted roll dough. Just make sure whatever dough you choose can roll out smoothly and seal tightly around the filling.
Options for Substitutions
Don’t be afraid to play around with the ingredients in these Cheesy Taco Sticks. They’re incredibly adaptable:
- Ground Beef: You can swap this for ground turkey, chicken, or even plant-based crumbles for a vegetarian version.
- Cheddar Cheese: Use mozzarella for extra meltiness, pepper jack for a kick, or a Mexican cheese blend for variety.
- Taco Seasoning: If you don’t have a packet, a homemade mix of cumin, chili powder, garlic powder, and paprika works great.
- Dough: Crescent roll dough gives a buttery finish, while pizza dough leans more classic and chewy.
- Add-ins: Add sautéed onions, jalapeños, or black beans for extra texture and flavor.
- Dipping Sauces: Salsa, sour cream, guacamole, or even queso are all welcome on the side.
These swaps let you make the recipe fit your dietary needs or simply spice it up to match your taste.
Ingredients for This Cheesy Taco Sticks Recipe
- Ground Beef – The hearty base of the filling; seasoned and browned for rich, savory flavor.
- Taco Seasoning – Brings the bold, classic taco taste; you can use store-bought or homemade.
- Refrigerated Pizza Dough or Crescent Roll Dough – The golden, flaky outer layer that wraps everything together.
- Cheddar Cheese – Melts beautifully inside and on top for that irresistible cheesy pull.
- Garlic Powder – Adds a subtle boost of flavor to the dough before baking.
- Butter – Brushed on top for a crisp, golden finish and buttery richness.
- Fresh Cilantro (optional) – Sprinkled over the top for a burst of freshness and color.
- Salsa, Sour Cream, or Guacamole (optional) – Perfect dips to serve alongside for extra flavor.
These simple ingredients come together to make something that tastes like you spent way more time in the kitchen than you actually did.

Step 1: Cook the Taco Meat
In a skillet over medium heat, brown the ground beef until fully cooked. Drain excess fat, then stir in taco seasoning along with a splash of water. Let it simmer until thickened and flavorful. Remove from heat and let it cool slightly before assembling.
Step 2: Roll Out the Dough
On a lightly floured surface, unroll your refrigerated pizza dough or crescent rolls. If using crescent dough, pinch the seams to create one smooth sheet. Cut into rectangles roughly 3×5 inches in size—these will be your wrappers.
Step 3: Fill and Seal
Spoon a generous amount of taco meat into the center of each dough rectangle. Top with shredded cheddar cheese. Fold over the dough, pinching the edges tightly to seal, forming a stick shape. Make sure the edges are well closed so nothing leaks during baking.
Step 4: Add Finishing Touches
Place the filled sticks seam-side down on a baking sheet lined with parchment paper. Brush the tops with melted butter and sprinkle with garlic powder. If desired, add extra shredded cheese and a pinch of chopped cilantro on top.
Step 5: Bake to Perfection
Bake in a preheated oven at 375°F (190°C) for 15–18 minutes or until golden brown and crisp. Let them cool for a few minutes before serving.
How Long to Cook the Cheesy Taco Sticks
You’ll want to bake these in a preheated 375°F (190°C) oven for about 15 to 18 minutes. Keep an eye on them starting around the 15-minute mark—they’re done when the tops are golden brown and the cheese is bubbling. If you’re using thicker dough or added extra filling, they might need a couple of minutes more.
Tips for Perfect Cheesy Taco Sticks
- Cool the filling slightly before assembling so the dough doesn’t become soggy or tear.
- Seal the edges well—press down with your fingers or a fork to prevent leaks.
- Use parchment paper or a nonstick baking sheet to avoid sticking and for easy cleanup.
- Add a cheese layer last when assembling to create that classic cheese-pull moment when bitten into.
- Brush with butter before baking for an irresistible golden, crispy finish.
- Let them rest a few minutes after baking—this helps the cheese settle slightly and makes them easier to handle.
These small tricks go a long way toward making sure your taco sticks come out looking and tasting like a hit every single time.
Watch Out for These Mistakes While Cooking
Even a simple recipe like Cheesy Taco Sticks has a few potential pitfalls. Here’s what to avoid:
- Overfilling the dough – It’s tempting to pack in the meat and cheese, but too much can cause leaks or tearing.
- Skipping the edge seal – If the edges aren’t firmly sealed, the filling will ooze out during baking.
- Not draining the meat – Excess grease from the beef can make the dough soggy and greasy.
- Using cold dough straight from the fridge – Letting it rest for 10 minutes at room temperature makes it easier to roll and fold.
- Baking too close together – Space them out on the baking sheet so they crisp evenly.
What to Serve With Cheesy Taco Sticks?
These taco sticks are incredibly versatile, and you can pair them with a variety of sides and dips to make a full meal or a fun snack spread.
Salsa & Guacamole
A classic combo for dipping—cool guac and zesty salsa complement the warm, cheesy filling perfectly.
Sour Cream or Greek Yogurt
Adds a creamy, tangy touch that cools down the spices in the taco meat.
Mexican Street Corn
Sweet, creamy, and a little spicy—this side dish pairs beautifully with the bold taco flavors.
Cilantro Lime Rice
A fresh and flavorful base that balances the richness of the cheesy sticks.
Tortilla Chips & Queso
Keep the Tex-Mex theme going with crunchy chips and a hot, cheesy dip.
Simple Green Salad
Something crisp and light helps cut through the richness—go with lime vinaigrette for a nice zing.
Pickled Jalapeños or Onions
If you like heat or acidity, these quick-pickled sides add contrast and punch.
Refried Beans or Black Beans
A hearty, protein-rich side that rounds out the meal.
Storage Instructions
Cheesy Taco Sticks store wonderfully, making them a smart choice for meal prep or leftovers. Here’s how to keep them tasting fresh:
- Refrigerator: Place cooled taco sticks in an airtight container and store for up to 4 days. Reheat in the oven or air fryer to maintain crispiness.
- Freezer: Wrap each stick individually in foil or plastic wrap, then place in a freezer bag. They’ll keep well for up to 2 months. Thaw in the fridge overnight and reheat at 350°F until heated through.
- Reheating Tip: Avoid microwaving if possible—it softens the crust. The oven or air fryer keeps the outside crispy while warming the inside evenly.
Estimated Nutrition
Here’s an approximate breakdown per cheesy taco stick, assuming the recipe makes 8:
- Calories: 270–320 (depending on dough and cheese)
- Protein: 13–16g
- Fat: 15–18g
- Carbohydrates: 22–26g
- Fiber: 1–2g
- Sugar: 2g
- Sodium: 500–700mg
These numbers will vary based on the ingredients you choose, especially the type of dough and cheese.
Frequently Asked Questions
How do I keep the taco sticks from falling apart?
Make sure the dough is sealed tightly around the edges. Don’t overfill, and place them seam-side down on the baking sheet to help them hold their shape while baking.
Can I make these ahead of time?
Yes! Assemble the sticks and refrigerate them for up to 24 hours before baking. You can also freeze them unbaked—just add a few extra minutes to the baking time if cooking from frozen.
What if I don’t have taco seasoning?
No problem! Mix 1 teaspoon each of chili powder and cumin, ½ teaspoon garlic powder, onion powder, and paprika, plus a pinch of salt and pepper.
Can I use shredded chicken instead of beef?
Absolutely. Shredded rotisserie chicken seasoned with taco spices works great and gives a lighter option.
Are these good for lunchboxes?
Yes—they’re handheld, not too messy, and still taste great at room temperature. Pack with a small container of salsa or sour cream for dipping.
Can I reheat them in the microwave?
You can, but the crust will soften. For best texture, reheat in the oven or air fryer until warmed through and crisp.
Is there a gluten-free option?
Use a gluten-free pizza dough or crescent dough alternative. Many store-bought versions are available, just double-check the ingredients.
How can I make these spicier?
Add chopped jalapeños to the filling, use pepper jack cheese, or sprinkle crushed red pepper flakes on top before baking.
Conclusion
Cheesy Taco Sticks are one of those recipes that’s as fun to make as it is to eat. They’re quick, comforting, and endlessly adaptable—perfect for feeding a crowd or just satisfying a weeknight craving. Whether you go classic with beef and cheddar or mix things up with your own twist, these taco sticks deliver every time. Make a batch soon, and I promise you’ll be hooked.

Cheesy Taco Sticks
- Total Time: 30 minutes
- Yield: 8 taco sticks 1x
Description
Cheesy Taco Sticks are a fun, portable twist on classic tacos, wrapped in golden dough and filled with seasoned beef and melty cheese. Perfect as a snack, appetizer, or light dinner, they’re kid-friendly and crowd-pleasing.
Ingredients
- 1 pound ground beef
- 1 packet taco seasoning (or 2 tablespoons homemade mix)
- 1/4 cup water
- 1 can refrigerated pizza dough or crescent roll dough
- 1 to 1 1/2 cups shredded cheddar cheese
- 2 tablespoons butter, melted
- 1/2 teaspoon garlic powder
- Optional: chopped fresh cilantro for garnish
- Optional: salsa, sour cream, or guacamole for dipping
Instructions
- Preheat oven to 375°F (190°C). Line a baking sheet with parchment paper.
- In a skillet over medium heat, cook ground beef until browned. Drain excess fat.
- Add taco seasoning and water. Simmer for 3–4 minutes until thickened. Remove from heat and let cool slightly.
- Roll out dough on a lightly floured surface. Cut into 3×5 inch rectangles.
- Spoon a layer of taco meat in the center of each dough piece. Add shredded cheddar on top.
- Fold over the dough and seal edges tightly. Place seam-side down on the baking sheet.
- Brush with melted butter and sprinkle with garlic powder. Add cheese and cilantro on top if desired.
- Bake for 15–18 minutes or until golden brown. Cool slightly before serving.
- Prep Time: 15 minutes
- Cook Time: 15 minutes