
 Sally Thompson
Few things compare to the satisfaction of pulling a homemade pie from the oven with a perfectly golden, buttery crust. A great pie crust should be tender enough to melt in your mouth while still sturdy enough to hold your favorite fillings. This Buttery Flaky Pie Crust delivers exactly that balance, creating delicate layers that bake up crisp, rich, and beautifully textured every single time.
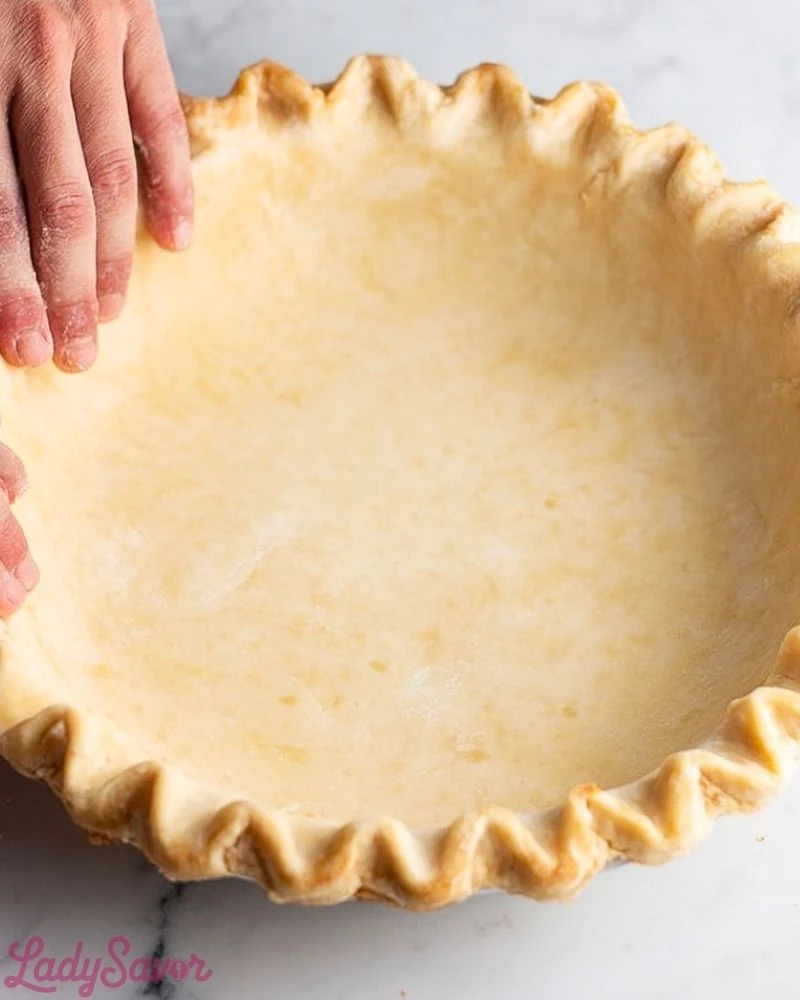
Whether you’re preparing a classic apple pie, a silky cream pie, or a savory quiche, this versatile crust becomes the foundation that makes every recipe shine. Made with simple pantry staples and a few smart techniques, this homemade crust is far superior to store-bought versions and surprisingly easy to master.
Why You’ll Love This Buttery Flaky Pie Crust
This pie crust stands out because of its incredible texture and rich buttery flavor. Every bite has light, flaky layers that practically crumble in the best way possible. The dough is easy to work with, rolls out smoothly, and bakes evenly without becoming tough.
Another reason this recipe is a favorite is its flexibility. It works beautifully for fruit pies, custard pies, pot pies, galettes, and tarts. You can prepare the dough ahead of time, refrigerate it, or freeze it for later baking, making it perfect for holiday baking and meal prep. Once you try this homemade version, it’s hard to go back to packaged crusts.
Preparation Phase & Tools to Use
Making a successful Buttery Flaky Pie Crust starts with using the right tools and understanding their purpose. Each item helps maintain the dough’s delicate texture and keeps the butter cold, which is essential for creating flaky layers.
Essential Tools and Equipment
- Large Mixing Bowl: Gives you enough room to combine ingredients without overworking the dough.
- Pastry Cutter or Food Processor: Helps cut cold butter into the flour quickly while keeping the butter pieces intact.
- Rolling Pin: Ensures the dough rolls evenly for consistent baking.
- Plastic Wrap: Keeps the dough from drying out while chilling.
- Pie Dish: Supports the crust shape and promotes even baking.
- Bench Scraper: Useful for handling sticky dough and transferring it cleanly.
- Measuring Cups and Spoons: Accurate measurements are critical for proper dough consistency.
- Pastry Brush: Ideal for applying egg wash if desired for a golden finish.
Keeping your equipment cold can also improve results. Chilled bowls, cold butter, and ice water all contribute to achieving those signature flaky layers.
Preparation Tips
The secret to a truly flaky pie crust lies in temperature and handling. Always use very cold butter and ice water to prevent the fat from melting before baking. Small chunks of butter scattered throughout the dough create steam in the oven, producing those delicate flaky layers.
Avoid overmixing the dough, as too much handling develops gluten and can make the crust tough instead of tender. Once the dough just comes together, stop mixing and shape it gently. Chilling the dough before rolling allows the gluten to relax and keeps the butter firm, making the crust easier to work with and helping it maintain its shape during baking.
When rolling out the dough, work on a lightly floured surface and rotate it frequently to prevent sticking. If the dough becomes too soft at any point, place it back in the refrigerator for 10 to 15 minutes before continuing.
Ingredients for Buttery Flaky Pie Crust
This recipe makes enough dough for one double-crust 9-inch pie or two single pie crusts.
Dry Ingredients
- 2 ½ cups all-purpose flour
- 1 teaspoon salt
- 1 tablespoon granulated sugar (optional, but recommended for sweet pies)
Fat
- 1 cup unsalted butter, very cold and cut into small cubes
Liquid
- 6 to 8 tablespoons ice water
Optional Ingredients
- 1 teaspoon apple cider vinegar or lemon juice for extra tenderness
- 1 egg beaten with 1 tablespoon water for egg wash
Ingredient Notes
- All-Purpose Flour: Provides the ideal balance between tenderness and structure.
- Cold Butter: The most important ingredient for creating flaky layers. Keep it chilled until ready to use.
- Ice Water: Helps the dough come together while keeping the butter cold.
- Sugar: Adds subtle flavor and promotes browning in dessert pies.
- Vinegar or Lemon Juice: Helps inhibit gluten development for a more tender crust.
Step-by-Step Instructions for Buttery Flaky Pie Crust
Step 1: Prepare the Ingredients
Start by measuring all ingredients accurately. Cut the butter into small cubes and place it in the refrigerator or freezer for about 10 minutes before mixing. Fill a small bowl with water and ice so the water stays extremely cold.
Cold ingredients are essential because they prevent the butter from melting into the flour before baking.
Step 2: Mix the Dry Ingredients
In a large mixing bowl, whisk together the flour, salt, and sugar until evenly combined. This ensures the seasoning distributes properly throughout the dough.
Mixing the dry ingredients first also prevents overworking the dough later.
Step 3: Cut the Butter Into the Flour
Add the cold butter cubes to the flour mixture. Using a pastry cutter, two forks, or a food processor, cut the butter into the flour until the mixture resembles coarse crumbs with pea-sized butter pieces throughout.
Do not overmix. Visible butter pieces are what create flaky layers during baking.
If using a food processor, pulse in short bursts instead of continuous blending.
Step 4: Add Ice Water Gradually
Drizzle in the ice water one tablespoon at a time while gently mixing with a fork or spatula. Add only enough water for the dough to begin clumping together when pressed between your fingers.
The dough should look slightly shaggy rather than smooth or wet.
Humidity and flour brands can affect how much water you need, so avoid pouring all the water in at once.
Step 5: Form the Dough
Transfer the mixture onto a lightly floured surface. Gently gather the dough together with your hands without kneading it too much.
Divide the dough into two equal portions and shape each into a flat disk. Flattening the dough helps it chill faster and makes rolling easier later.
You should still see small streaks or specks of butter in the dough.
Step 6: Chill the Dough
Wrap each dough disk tightly in plastic wrap and refrigerate for at least 1 hour.
This resting period allows:
- The gluten to relax
- The flour to fully hydrate
- The butter to firm up again
Skipping this step can lead to shrinkage and a tough crust.
For even better flavor and texture, chill the dough overnight.
Step 7: Roll Out the Dough
Lightly flour your work surface and rolling pin. Remove one dough disk from the refrigerator and let it sit for about 5 minutes if it feels too firm.
Roll from the center outward, rotating the dough frequently to maintain an even circle and prevent sticking.
Roll the dough into a circle about 12 inches wide and approximately ⅛ inch thick.
Avoid adding too much flour while rolling, as excess flour can make the crust dry.
Step 8: Transfer Dough to Pie Dish
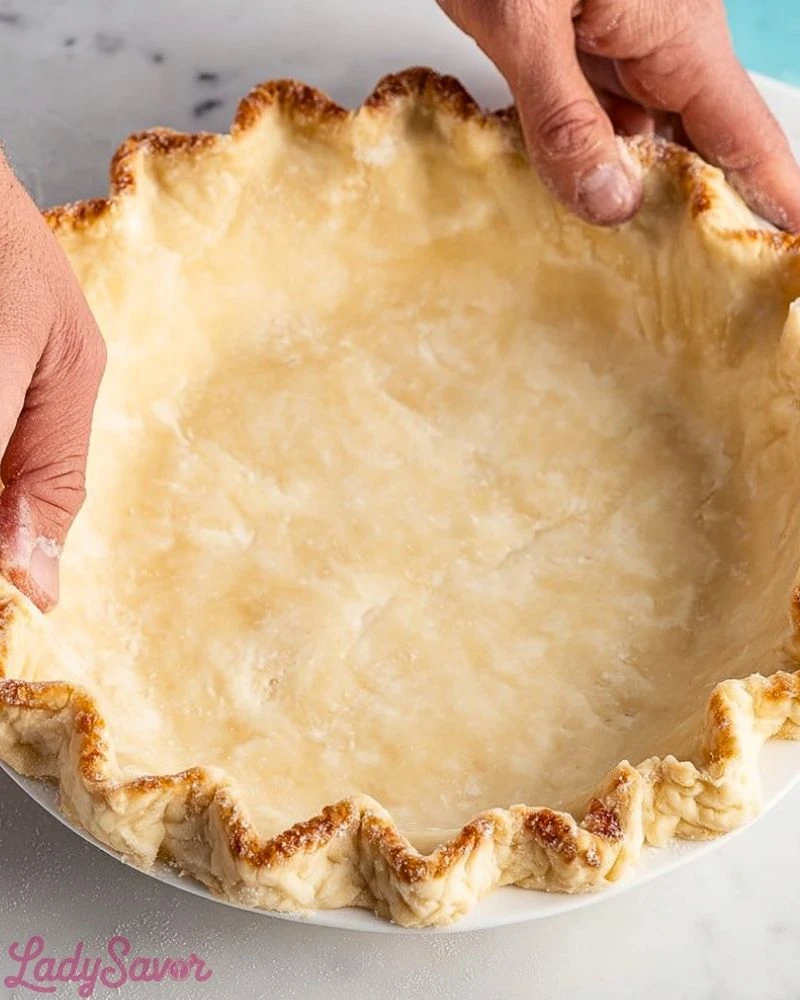
Carefully lift the dough and place it into the pie dish. Gently press it into the bottom and sides without stretching it.
Trim excess dough, leaving about 1 inch hanging over the edge for crimping.
Stretching the dough can cause shrinkage during baking.
Step 9: Crimp the Edges
Fold the overhanging dough under itself to create a thicker border. Crimp the edges using your fingers or a fork for a decorative finish.
A properly crimped edge not only looks beautiful but also helps keep fillings contained.
Step 10: Chill Before Baking
Place the prepared crust in the refrigerator for 15 to 20 minutes before baking.
This extra chilling step helps maintain the crust’s shape and improves flakiness.
If making a double-crust pie, repeat the rolling process for the top crust.
Step 11: Blind Bake if Needed
For recipes requiring a pre-baked crust:
- Preheat oven to 375°F (190°C)
- Line the crust with parchment paper
- Fill with pie weights or dried beans
- Bake for 15 minutes
- Remove weights and parchment
- Bake another 10 to 15 minutes until lightly golden
Blind baking prevents soggy bottoms in custard or cream pies.
Step 12: Fill and Bake
Add your desired filling and bake according to your pie recipe instructions.
For double-crust pies:
- Cut slits in the top crust for steam vents
- Brush with egg wash for a glossy golden finish
- Sprinkle with coarse sugar if desired
The crust is done when deeply golden and crisp.
Notes
A successful Buttery Flaky Pie Crust comes down to patience and temperature control. Keeping the butter cold throughout the process is the key to creating steam pockets during baking, which form those irresistible flaky layers. If your kitchen is warm, refrigerate the dough whenever it starts feeling soft.
This dough can be made entirely by hand or with a food processor. While a processor is convenient, hand mixing gives you more control over the butter pieces and can often produce even flakier results. Avoid overworking the dough once the water is added, since excess mixing develops gluten and creates a dense crust.
For extra flavor, try using high-quality European-style butter with a higher fat content. You can also customize the crust slightly depending on the pie type. Add a little extra sugar for sweet pies or herbs and cracked pepper for savory pies.
If cracks appear while rolling the dough, simply press them back together gently. Pie dough is forgiving and easy to patch. Chilling between steps always helps restore the dough’s texture and prevents frustration during shaping.
Watch Out for These Mistakes While Cooking
Using Warm Butter
Warm or softened butter blends completely into the flour instead of creating layers. This leads to a dense and greasy crust rather than a flaky one.
Solution
Always use cold butter straight from the refrigerator or freezer.
Adding Too Much Water
Excess water creates sticky dough and develops too much gluten, making the crust chewy and tough.
Solution
Add ice water gradually and stop as soon as the dough holds together when pressed.
Overworking the Dough
Kneading or excessive mixing activates gluten, which removes tenderness from the crust.
Solution
Handle the dough gently and mix only until combined.
Skipping the Chilling Time
Warm dough shrinks during baking and loses its flaky texture.
Solution
Chill the dough before rolling and again before baking.
Stretching the Dough Into the Pie Pan
Stretching causes the crust to pull back and shrink in the oven.
Solution
Lower the dough gently into the pan without pulling or stretching.
Forgetting Steam Vents in Double Crust Pies
Without vents, steam gets trapped inside and may burst the crust unevenly.
Solution
Cut several slits or decorative vents in the top crust before baking.
Underbaking the Crust
A pale crust may look done but often tastes doughy and lacks crisp texture.
Solution
Bake until the crust turns deep golden brown.
Storage Instructions
Freshly prepared pie dough can be refrigerated for up to 3 days when tightly wrapped in plastic wrap. Keeping it sealed prevents the dough from drying out or absorbing refrigerator odors.
For longer storage, freeze the dough disks for up to 3 months. Wrap each disk in plastic wrap followed by aluminum foil or place them in freezer-safe bags. Thaw overnight in the refrigerator before rolling.
A fully baked pie crust can also be stored at room temperature for up to 2 days if covered loosely. For longer freshness, refrigerate baked crusts for up to 5 days.
If reheating a baked pie, place it in a 350°F oven for several minutes to restore crispness. Avoid microwaving whenever possible because it softens the crust.
Estimated Nutrition
Per Serving (Based on 8 Servings)
- Calories: 260
- Carbohydrates: 20g
- Protein: 3g
- Fat: 19g
- Saturated Fat: 12g
- Cholesterol: 50mg
- Sodium: 180mg
- Fiber: 1g
- Sugar: 1g
Nutritional values may vary depending on ingredient brands and serving sizes.
Frequently Asked Questions
Can I make the pie dough ahead of time?
Yes, the dough can be made up to 3 days in advance and stored in the refrigerator. It also freezes very well for longer storage.
Why is my pie crust tough instead of flaky?
Tough crust usually happens from overmixing the dough or adding too much water. Gentle handling is essential.
Can I use salted butter instead of unsalted butter?
Yes, but reduce the added salt slightly to avoid an overly salty crust.
What’s the best flour for pie crust?
All-purpose flour works best because it provides the right balance between tenderness and structure.
How do I prevent a soggy bottom crust?
Blind baking helps prevent sogginess, especially for custard or cream pies. Baking on the lower oven rack also helps crisp the bottom.
Can I freeze an unbaked pie crust in the pie dish?
Absolutely. Assemble the crust in the pan, wrap tightly, and freeze for up to 3 months.
Why did my crust shrink during baking?
Shrinkage usually happens when the dough is stretched into the pan or not chilled properly before baking.
Is shortening better than butter for pie crust?
Butter provides superior flavor, while shortening can create extra tenderness. Some bakers combine both for balanced results.
Conclusion
Mastering a homemade Buttery Flaky Pie Crust is one of the most rewarding baking skills you can learn. With simple ingredients, careful handling, and proper chilling, you can create a crust that’s crisp, tender, and beautifully layered every time.
This versatile crust works for everything from classic fruit pies to savory dishes and holiday desserts. Once you experience the rich buttery flavor and delicate texture of homemade pie dough, it quickly becomes a staple recipe you’ll return to again and again.
Whether you’re baking for a special gathering or simply enjoying a weekend baking project, this crust provides the perfect foundation for unforgettable pies.
Buttery Flaky Pie Crust
- Total Time: 1 hour 50 minutes
- Yield: 2 pie crusts 1x
- Diet: Vegetarian
Description
This Buttery Flaky Pie Crust is rich, tender, buttery, and packed with delicate flaky layers that bake beautifully every time. Perfect for sweet pies, savory pies, holiday desserts, and homemade comfort food, this easy recipe creates a golden crust with incredible texture and flavor. Whether you need quick baking ideas, classic dessert recipes, homemade pie dough, or easy food ideas for gatherings, this crust delivers bakery-style results with simple pantry ingredients.
Ingredients
2 ½ cups all-purpose flour
1 teaspoon salt
1 tablespoon granulated sugar
1 cup unsalted butter, cold and cubed
6 tablespoons ice water
1 tablespoon additional ice water if needed
1 teaspoon apple cider vinegar or lemon juice optional
1 egg
1 tablespoon water for egg wash optional
Instructions
1. In a large mixing bowl, whisk together the flour, salt, and sugar until evenly combined.
2. Add the cold cubed butter and cut it into the flour using a pastry cutter or food processor until the mixture resembles coarse crumbs with pea-sized butter pieces.
3. Slowly add the ice water one tablespoon at a time while gently mixing until the dough begins to hold together.
4. Add vinegar or lemon juice if using and lightly combine.
5. Transfer the dough onto a lightly floured surface and gently gather it into a ball without kneading.
6. Divide the dough into two equal disks and wrap tightly in plastic wrap.
7. Refrigerate the dough for at least 1 hour before rolling.
8. Roll one dough disk into a 12-inch circle on a lightly floured surface.
9. Carefully place the dough into a 9-inch pie dish and gently press it into the bottom and sides.
10. Trim and crimp the edges as desired.
11. Chill the prepared crust for 15 to 20 minutes before baking.
12. For blind baking, line the crust with parchment paper and pie weights, then bake at 375°F for 15 minutes. Remove weights and bake another 10 to 15 minutes until lightly golden.
13. Fill and bake according to your preferred pie recipe.
Notes
Always keep the butter and water extremely cold to achieve flaky layers.
Avoid overmixing the dough to keep the crust tender instead of tough.
Chill the dough before rolling and before baking for the best texture and shape.
- Prep Time: 20 minutes
- Cook Time: 30 minutes
- Category: Dessert
- Method: Baking
- Cuisine: American
Nutrition
- Serving Size: 1 slice
- Calories: 260
- Sugar: 1g
- Sodium: 180mg
- Fat: 19g
- Saturated Fat: 12g
- Unsaturated Fat: 5g
- Trans Fat: 0g
- Carbohydrates: 20g
- Fiber: 1g
- Protein: 3g
- Cholesterol: 50mg