
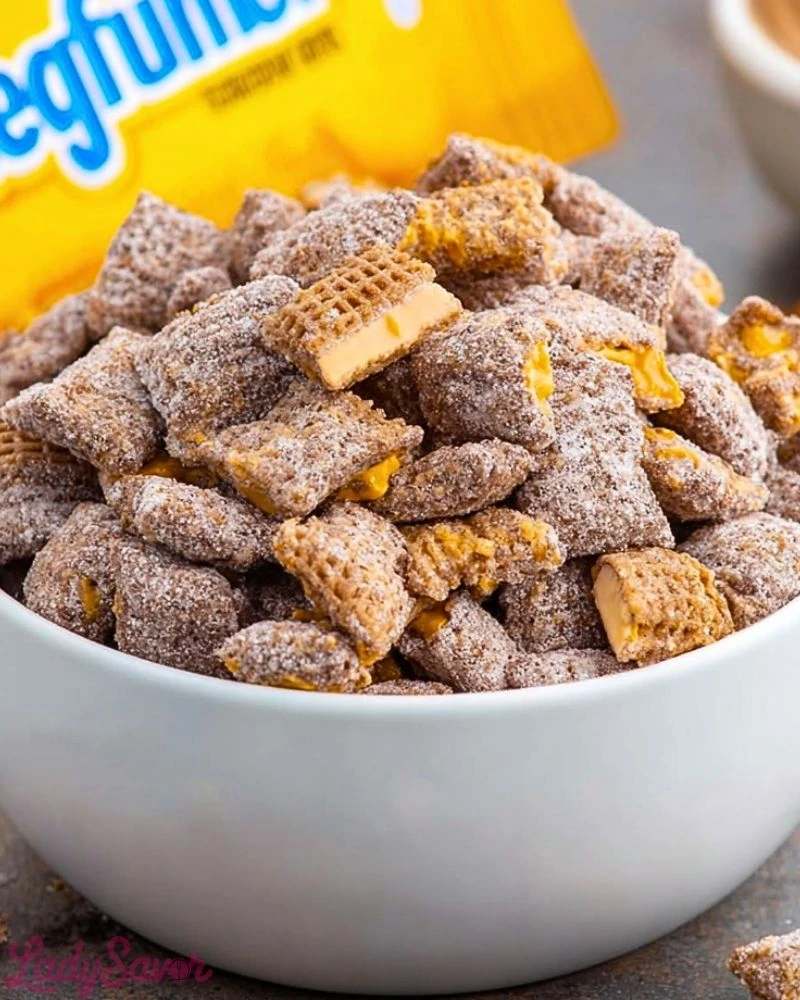
Butterfinger Puppy Chow is the kind of sweet snack that disappears from the bowl almost as quickly as you make it. Every crunchy bite is coated in rich chocolate and creamy peanut butter, then tossed in powdered sugar for that classic melt-in-your-mouth finish. Crushed Butterfinger candy bars add an irresistible crispy texture and caramelized peanut butter flavor that takes this nostalgic treat to another level.
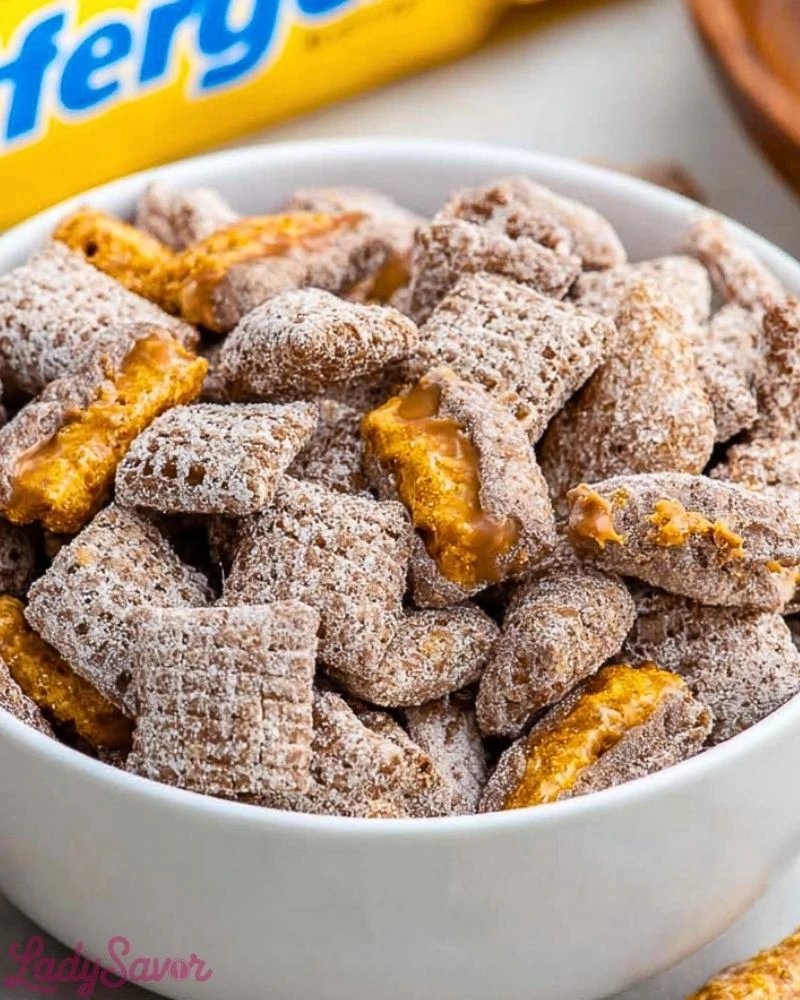
Perfect for movie nights, holiday gatherings, game days, or late-night cravings, this no-bake dessert is easy to throw together in minutes. The combination of cereal crunch, chocolate coating, and candy bar pieces creates a snack mix that feels both playful and indulgent. Whether you call it muddy buddies or puppy chow, this Butterfinger version is guaranteed to become a favorite.
Why You’ll Love This Butterfinger Puppy Chow
- Quick and easy no-bake dessert that comes together fast.
- Sweet, crunchy, and packed with peanut butter flavor.
- Perfect for parties, gifting, and holiday snack trays.
- Uses simple pantry ingredients with minimal prep.
- Great make-ahead treat that stores well.
- Easy to customize with extra candies, nuts, or chocolate drizzle.
- Kid-friendly and fun to prepare together.
Preparation Phase & Tools to Use
Having the right tools ready before starting makes preparing Butterfinger Puppy Chow smooth and mess-free. A large mixing bowl is essential for evenly coating the cereal without crushing it. A microwave-safe bowl allows you to melt the chocolate and peanut butter mixture safely and quickly. A silicone spatula helps stir the melted ingredients until silky smooth while scraping every bit from the bowl. Measuring cups ensure balanced ingredient ratios for the perfect texture and sweetness. You’ll also need a large zip-top bag or container with a lid to shake the powdered sugar evenly over the coated cereal. Finally, a baking sheet or parchment-lined tray is useful for spreading the puppy chow to cool and prevent clumping.
Preparation Tips
Use fresh crispy rice or corn cereal for the best crunch and texture. When melting the chocolate mixture, heat in short intervals and stir frequently to prevent scorching. Gently fold the cereal into the melted mixture to avoid breaking the pieces apart. Allow the coated cereal to cool slightly before adding powdered sugar so the coating sticks evenly without becoming gummy. Crushing the Butterfinger bars into a mix of small crumbs and larger chunks creates the best balance of texture throughout the snack mix. For extra flavor, chill the puppy chow for 15 to 20 minutes before serving so the chocolate coating firms up perfectly.
Ingredients for Butterfinger Puppy Chow
Creating the perfect Butterfinger Puppy Chow starts with a combination of crunchy cereal, creamy peanut butter, smooth chocolate, and the unmistakable crispy peanut butter candy flavor from Butterfinger bars. Each ingredient plays an important role in delivering the classic texture and sweet balance that makes this snack so addictive.
Main Ingredients
- 9 cups Rice Chex cereal or Corn Chex cereal
- 1 ½ cups semi-sweet chocolate chips
- ¾ cup creamy peanut butter
- ¼ cup unsalted butter
- 1 teaspoon vanilla extract
- 2 cups powdered sugar
- 4 full-size Butterfinger candy bars, crushed
Optional Add-Ins
- ½ cup mini chocolate chips
- ½ cup peanut butter chips
- ¼ cup chopped roasted peanuts
- Extra crushed Butterfinger for garnish
- Sea salt flakes for a sweet-and-salty finish
Ingredient Notes
Chex Cereal: Rice Chex creates a lighter texture while Corn Chex gives a slightly heartier crunch. Either works beautifully in this recipe.
Chocolate Chips: Semi-sweet chocolate keeps the sweetness balanced, but milk chocolate can be used for a sweeter dessert snack.
Peanut Butter: Creamy peanut butter melts more smoothly and coats the cereal evenly. Natural peanut butter can separate and affect the texture.
Powdered Sugar: This creates the signature snowy coating and prevents the cereal pieces from sticking together.
Butterfinger Bars: Crushing the candy bars into mixed-size pieces adds both crunch and bursts of peanut buttery caramel flavor.
Step 1: Prepare Your Workspace
Before starting, line a large baking sheet or countertop area with parchment paper or wax paper. Measure all ingredients ahead of time so the mixing process moves quickly once the chocolate mixture is melted.
Place the cereal into a very large mixing bowl, leaving enough room to gently stir without crushing the cereal pieces.
Step 2: Crush the Butterfinger Bars
Unwrap the Butterfinger candy bars and place them into a zip-top bag. Use a rolling pin or heavy spoon to crush them into small chunks and crumbs.
Avoid crushing them too finely because larger pieces create delicious crunchy bites throughout the puppy chow.
Set aside a small handful for topping later if desired.
Step 3: Melt the Chocolate Mixture
In a microwave-safe bowl, combine the semi-sweet chocolate chips, peanut butter, and unsalted butter.
Microwave in 30-second intervals, stirring thoroughly after each interval until the mixture becomes completely melted and smooth. This usually takes about 1½ to 2 minutes total.
Stir in the vanilla extract once fully melted.
The mixture should look glossy, creamy, and easy to pour.
Step 4: Coat the Cereal
Slowly pour the warm chocolate mixture over the cereal.
Using a silicone spatula or large spoon, gently fold the cereal until every piece is evenly coated. Work carefully to avoid crushing the cereal while making sure all surfaces are covered.
Once coated, allow the cereal mixture to cool for about 2 to 3 minutes before adding powdered sugar.
Step 5: Add the Powdered Sugar
Transfer half of the coated cereal into a large zip-top bag or airtight container with a lid.
Add half of the powdered sugar and shake gently until evenly coated.
Repeat with the remaining cereal and powdered sugar.
Shaking in batches helps the powdered sugar distribute more evenly and prevents clumping.
Step 6: Mix in the Butterfinger Pieces
Spread the coated puppy chow onto the prepared baking sheet.
Sprinkle the crushed Butterfinger candy pieces over the mixture and gently toss to combine.
If adding optional ingredients like mini chocolate chips or peanuts, mix them in at this stage.
Allow the puppy chow to cool completely before serving so the coating firms up perfectly.
Step 7: Serve and Enjoy
Transfer the Butterfinger Puppy Chow to a serving bowl or snack containers.
Serve immediately for maximum crunch or chill for 15 to 20 minutes for an even crispier texture.
This sweet snack mix is perfect for parties, lunchbox treats, holiday dessert tables, road trips, movie nights, and edible gift bags.
Flavor Variations and Creative Twists
White Chocolate Butterfinger Puppy Chow
Replace semi-sweet chocolate chips with white chocolate chips for a sweeter and creamier version.
Double Peanut Butter Version
Add peanut butter chips along with the chocolate chips for extra peanut butter richness.
Holiday Party Mix
Mix in seasonal candies, sprinkles, or colored chocolate candies to customize the recipe for holidays and celebrations.
Frozen Butterfinger Puppy Chow
Store the puppy chow in the freezer and enjoy it straight from frozen for an extra crunchy dessert snack.
Salted Chocolate Version
Sprinkle flaky sea salt over the finished mixture to balance the sweetness and deepen the chocolate flavor.
Serving Ideas
- Package into decorative bags for homemade edible gifts.
- Add to dessert charcuterie boards.
- Serve in small cups for parties and gatherings.
- Pair with ice cream for a crunchy topping.
- Include in holiday cookie trays for extra variety.
- Use as a movie-night snack mix.
- Add to lunchboxes for a sweet surprise.
Notes
Butterfinger Puppy Chow is one of those desserts that delivers maximum flavor with very little effort. The combination of crispy cereal, smooth melted chocolate, creamy peanut butter, and crunchy Butterfinger candy creates a snack that is rich, sweet, and incredibly satisfying. Because this recipe is completely no-bake, it’s ideal for busy days, last-minute gatherings, and quick homemade treats.
One of the best things about this recipe is how customizable it can be. You can switch up the cereal, experiment with different chocolates, or add extra mix-ins to create your own signature version. It also makes an excellent make-ahead dessert because the flavors continue to blend together as it sits.
For the best texture, allow the puppy chow to cool completely before storing it. This helps the coating stay crisp and prevents excess moisture from softening the cereal. If you prefer an even crunchier texture, chilling the mixture briefly before serving works wonderfully.
This snack is perfect year-round but especially popular during holidays, game nights, movie marathons, birthday parties, and family gatherings. It’s also an easy edible gift idea that looks festive when packaged in jars, bags, or decorative tins.
Watch Out for These Mistakes While Cooking
Overheating the Chocolate
Chocolate can burn quickly if microwaved too long. Always heat in short intervals and stir between each round to maintain a smooth texture.
Crushing the Cereal
Mixing too aggressively can break the cereal into crumbs. Use gentle folding motions when coating the cereal with the melted mixture.
Adding Powdered Sugar Too Early
If the cereal is extremely hot, the powdered sugar can melt and become sticky instead of creating a light coating.
Using Natural Peanut Butter
Natural peanut butter tends to separate and can create an oily texture. Traditional creamy peanut butter works best for consistent results.
Not Allowing It to Cool
Storing the puppy chow before it cools completely may create condensation inside the container, causing sogginess.
Uneven Coating
Adding too much cereal at once can make it difficult to coat evenly. Make sure all pieces are lightly covered with the chocolate mixture before adding powdered sugar.
Skipping the Parchment Paper
Spreading the puppy chow onto parchment paper helps prevent clumping and allows the coating to set properly.
Storage Instructions
Butterfinger Puppy Chow stores exceptionally well, making it ideal for preparing ahead of time. Keep the snack mix in an airtight container at room temperature for up to 5 days. Store it in a cool, dry place away from direct sunlight or heat to prevent the chocolate from softening.
For longer storage, refrigerate the puppy chow for up to 2 weeks. Chilling also gives the coating a firmer texture and adds an extra crunch.
You can also freeze Butterfinger Puppy Chow for up to 2 months. Place it in a freezer-safe container or zip-top freezer bag and thaw for a few minutes before serving. Many people enjoy eating it straight from the freezer because of the crisp texture.
To maintain freshness, avoid leaving the snack uncovered for extended periods since exposure to air can make the cereal stale.
Estimated Nutrition
Per Serving (Approximate)
- Calories: 310
- Carbohydrates: 39g
- Protein: 5g
- Fat: 16g
- Saturated Fat: 6g
- Cholesterol: 8mg
- Sodium: 180mg
- Fiber: 2g
- Sugar: 24g
Nutritional values may vary depending on ingredient brands, portion sizes, and optional add-ins used.
Frequently Asked Questions
Can I make Butterfinger Puppy Chow ahead of time?
Yes, this recipe is excellent for making ahead. Store it in an airtight container and it will stay fresh for several days.
Can I use a different cereal?
Absolutely. Rice Chex and Corn Chex are the most popular options, but Crispix cereal also works well.
What if I do not have Butterfinger bars?
You can substitute other crunchy candy bars such as Heath bars, Reese’s pieces, or chopped peanut butter cups.
Can I use white chocolate instead of semi-sweet chocolate?
Yes, white chocolate creates a sweeter and creamier version of the recipe.
Why is my puppy chow sticky?
Sticky puppy chow usually happens when the chocolate mixture is too hot or the powdered sugar was added before the cereal cooled slightly.
Is Butterfinger Puppy Chow gluten-free?
It can be if you use certified gluten-free cereal and verify that all candy ingredients are gluten-free.
Can I freeze Butterfinger Puppy Chow?
Yes, it freezes very well for up to 2 months in an airtight container.
How do I keep the cereal crunchy?
Allow the mixture to cool completely before storing and always use an airtight container to maintain freshness.
Conclusion
Butterfinger Puppy Chow combines everything people love about sweet snack mixes into one irresistible treat. The crunchy cereal, creamy peanut butter coating, rich chocolate, and crispy Butterfinger candy pieces create a dessert that is easy to make yet packed with flavor and texture.
Whether you prepare it for holidays, parties, movie nights, road trips, or everyday snacking, this no-bake recipe is guaranteed to be a crowd-pleaser. It requires simple ingredients, minimal effort, and delivers big results every single time.
Once you make a batch, it quickly becomes the kind of recipe friends and family request again and again. From its addictive crunch to its sweet peanut buttery finish, Butterfinger Puppy Chow is a fun homemade treat that never lasts long in the bowl.
Butterfinger Puppy Chow
- Total Time: 17 minutes
- Yield: 12 servings 1x
- Diet: Vegetarian
Description
Butterfinger Puppy Chow is a crunchy, chocolatey, peanut butter snack mix that comes together in minutes with simple pantry ingredients. This easy no-bake dessert combines crispy cereal coated in melted chocolate and creamy peanut butter, then tossed in powdered sugar and loaded with crushed Butterfinger candy bars for an irresistible sweet crunch. Perfect for quick dessert ideas, party snacks, holiday treats, movie nights, game days, and edible gifts, this easy recipe delivers bold flavor with minimal effort. Whether you need fun food ideas for gatherings or a quick sweet snack for the family, Butterfinger Puppy Chow is guaranteed to disappear fast.
Ingredients
9 cups Rice Chex cereal
1 1/2 cups semi-sweet chocolate chips
3/4 cup creamy peanut butter
1/4 cup unsalted butter
1 teaspoon vanilla extract
2 cups powdered sugar
4 full-size Butterfinger candy bars, crushed
1/2 cup mini chocolate chips (optional)
1/2 cup peanut butter chips (optional)
1/4 cup chopped roasted peanuts (optional)
1 teaspoon flaky sea salt (optional)
Instructions
1. Line a large baking sheet or countertop with parchment paper and place the cereal into a large mixing bowl.
2. Crush the Butterfinger candy bars into small chunks and crumbs using a rolling pin or heavy spoon.
3. In a microwave-safe bowl, combine the chocolate chips, peanut butter, and butter.
4. Microwave in 30-second intervals, stirring after each interval until smooth and fully melted.
5. Stir the vanilla extract into the melted chocolate mixture.
6. Pour the chocolate mixture over the cereal and gently fold until evenly coated.
7. Let the coated cereal cool for 2 to 3 minutes.
8. Transfer half of the cereal mixture into a large zip-top bag or airtight container.
9. Add half of the powdered sugar and shake until fully coated.
10. Repeat with the remaining cereal and powdered sugar.
11. Spread the puppy chow onto the prepared baking sheet.
12. Sprinkle the crushed Butterfinger pieces over the mixture and gently toss.
13. Add optional mini chocolate chips, peanut butter chips, or peanuts if desired.
14. Allow the puppy chow to cool completely before serving.
15. Serve immediately or chill for 15 to 20 minutes for extra crunch.
Notes
Allow the cereal mixture to cool slightly before adding powdered sugar so the coating stays light and fluffy instead of sticky.
Use traditional creamy peanut butter rather than natural peanut butter for the smoothest chocolate coating.
Store the puppy chow in an airtight container to maintain maximum crunch and freshness.
- Prep Time: 15 minutes
- Cook Time: 2 minutes
- Category: Dessert
- Method: No-bake
- Cuisine: American
Nutrition
- Serving Size: 1 serving
- Calories: 310
- Sugar: 24g
- Sodium: 180mg
- Fat: 16g
- Saturated Fat: 6g
- Unsaturated Fat: 8g
- Trans Fat: 0g
- Carbohydrates: 39g
- Fiber: 2g
- Protein: 5g
- Cholesterol: 8mg