
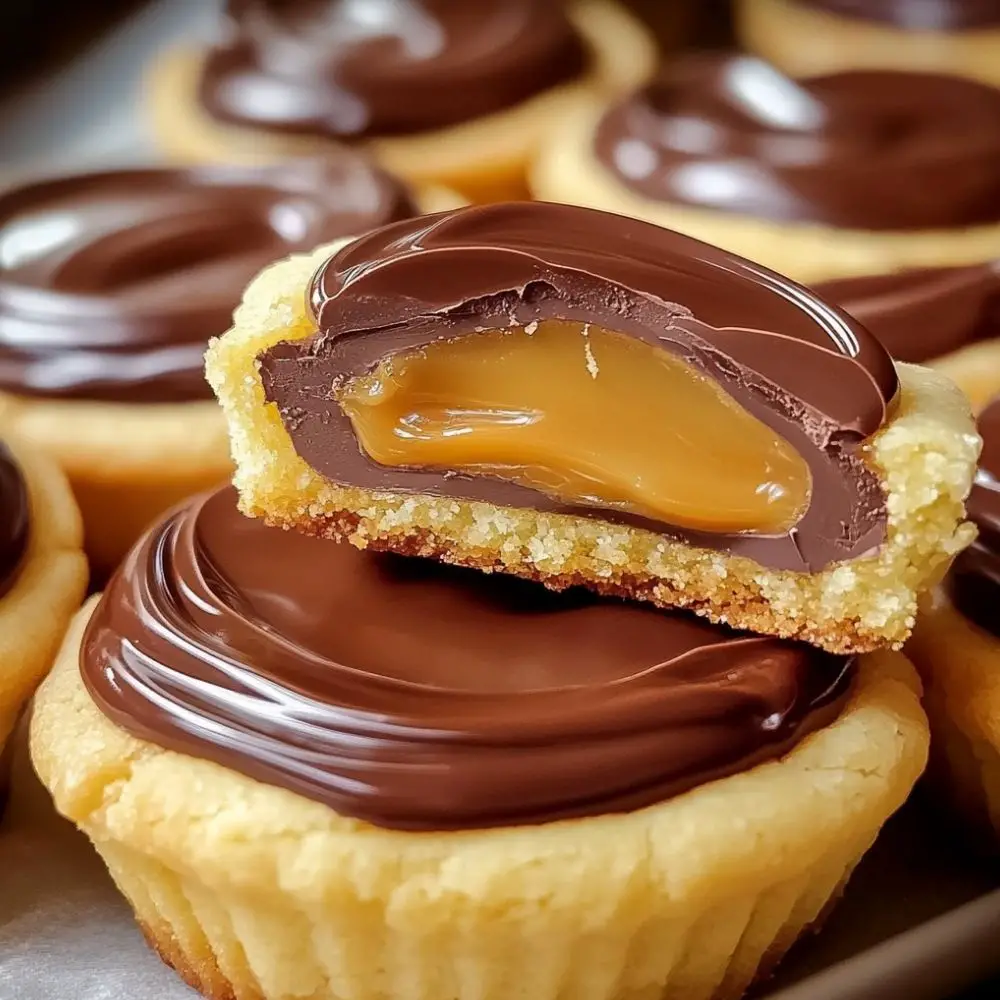
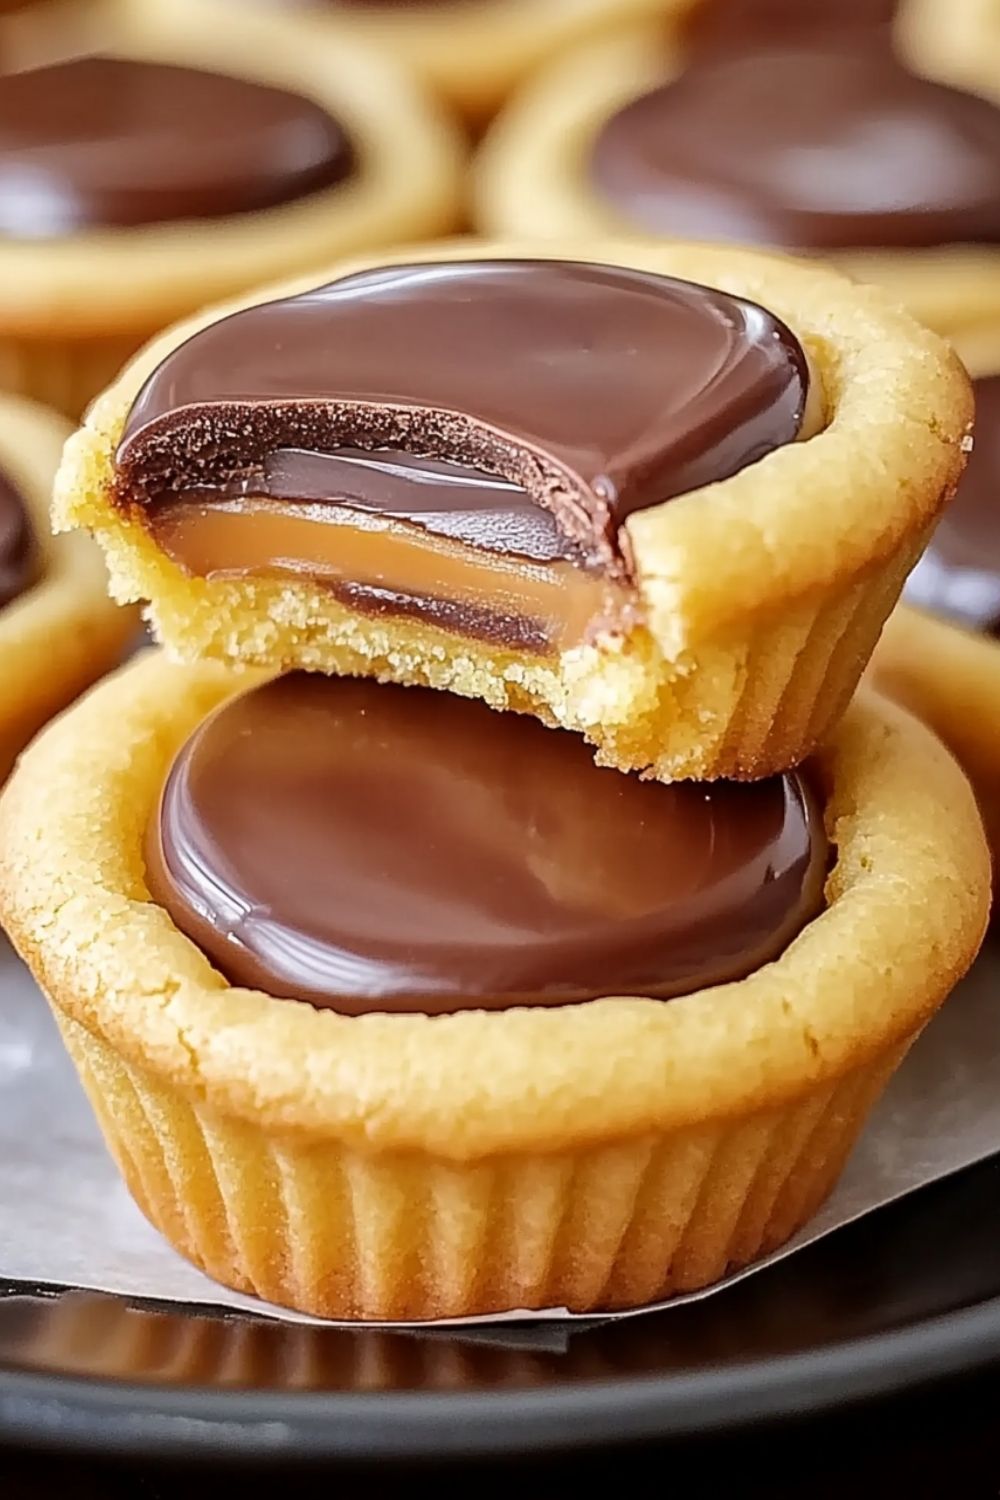
If you love the classic Twix candy bar, you’re in for a treat with these indulgent Twix Cookie Cups. Combining the buttery softness of a cookie base, the creamy richness of caramel, and the smooth layer of chocolate, these bite-sized desserts are pure decadence. Perfect for parties, holidays, or when you’re simply craving a sweet treat, these cookie cups deliver the same flavors of your favorite candy bar in an elegant, homemade form.
Irresistible Layers of Sweetness
Each Twix Cookie Cup is a delightful combination of textures and flavors. The soft cookie base cradles a luscious caramel center, all topped off with a glossy chocolate layer. They’re not only delicious but also visually stunning, making them a perfect choice for entertaining or gifting.
Whether you’re a seasoned baker or just starting out, this recipe is simple to follow and uses easy-to-find ingredients. With a little effort, you’ll have a tray of picture-perfect cookie cups that are guaranteed to disappear in no time.
Ingredients for Twix Cookie Cups
To create these delicious Twix-inspired treats, you’ll need a handful of simple ingredients that come together beautifully. Each component adds its own unique layer of flavor and texture to these cookie cups.
- Butter – Softened unsalted butter forms the base of the cookie dough, giving it a rich, tender texture.
- Granulated Sugar – Adds sweetness and helps create a perfectly soft and chewy cookie base.
- Brown Sugar – Enhances the flavor with a subtle caramel-like depth.
- Vanilla Extract – A splash of vanilla adds warmth and rounds out the flavors of the dough.
- All-Purpose Flour – Provides structure to the cookie cups, creating a soft yet sturdy base.
- Baking Soda – Ensures the cookie cups rise slightly and hold their shape.
- Salt – Balances the sweetness and enhances the overall flavor.
- Caramel Filling – Use soft caramels or caramel sauce to create the gooey center. If using soft caramels, melt them down with a little cream for a smooth texture.
- Chocolate – Choose milk or dark chocolate for the topping. Melted chocolate gives that shiny, irresistible finish.
- Heavy Cream – Optional, to thin the caramel or chocolate for a smoother texture.
How to Make Twix Cookie Cups
Crafting these Twix Cookie Cups is easier than you might think. With just a few steps, you’ll have a tray of delectable treats ready to enjoy.
Step 1:
Preheat your oven to 350°F (175°C). Lightly grease a mini muffin tin or line it with paper liners to ensure the cookie cups release easily.
Step 2:
In a large mixing bowl, cream together the softened butter, granulated sugar, and brown sugar until light and fluffy. Add the vanilla extract and mix until combined.
Step 3:
Gradually add the flour, baking soda, and salt to the butter mixture. Stir until a soft dough forms.
Step 4:
Scoop about a tablespoon of dough into each mini muffin cup. Use your fingers or the back of a spoon to press the dough evenly into the bottom and slightly up the sides, creating a cup shape.
Step 5:
Bake the cookie cups in the preheated oven for 10-12 minutes, or until the edges are lightly golden. Remove from the oven and use the back of a spoon or a small measuring cup to gently press down the centers while the cookie cups are still warm to maintain the cavity. Let them cool completely in the pan.
Step 6:
Melt the caramels with a splash of heavy cream in a microwave-safe bowl or over low heat on the stovetop. Stir until smooth. Spoon the caramel into the center of each cookie cup, filling them about three-quarters full.
Step 7:
Melt the chocolate in a microwave-safe bowl in 20-second intervals, stirring after each, until smooth and glossy. Spoon the melted chocolate over the caramel layer, spreading it to cover the top completely.
Step 8:
Allow the chocolate to set at room temperature or place the cookie cups in the refrigerator for quicker results. Once the chocolate is firm, gently remove the cookie cups from the tin and serve.
Enjoy these decadent Twix Cookie Cups with friends and family—or save them all for yourself!
How Long to Bake Twix Cookie Cups
Baking times for Twix Cookie Cups may vary slightly depending on your oven and the size of your mini muffin tin. The goal is to achieve a golden brown edge while keeping the cookie cups soft and tender.
- Standard Mini Muffin Tin – Bake for 10-12 minutes at 350°F (175°C).
- Smaller Cookie Cups – If your cups are smaller, check for doneness around 8-10 minutes.
- Larger Cookie Cups – For slightly bigger cups, bake for 12-14 minutes, but keep a close eye to avoid overbaking.
You’ll know the cookie cups are ready when the edges are set and lightly golden. It’s essential to press the centers while the cookie cups are still warm to create the perfect cavity for the caramel and chocolate layers.
How to Store Leftovers
These Twix Cookie Cups store well, making them a great make-ahead dessert or treat to enjoy over several days. Here’s how to store them properly:
- Room Temperature – Store in an airtight container at room temperature for up to 3 days. Keep them in a cool, dry place to prevent the chocolate from melting.
- Refrigerator – If your home is warm, store them in the fridge for up to a week. Bring them to room temperature before serving for the best flavor and texture.
- Freezer – Twix Cookie Cups freeze beautifully. Place them in a single layer in an airtight container, or wrap each one individually in plastic wrap and freeze for up to 2 months. Thaw at room temperature before enjoying.
Tips for Perfect Twix Cookie Cups
Make sure your cookie cups turn out beautifully every time with these helpful tips:
- Chill the Dough (Optional) – If your cookie dough feels too soft or sticky, chill it for 15-20 minutes before shaping. This helps the dough hold its shape during baking.
- Press the Centers While Warm – Gently press the centers of the cookie cups immediately after baking to create a cavity for the caramel. Use the back of a spoon or a small cup for even results.
- Choose High-Quality Chocolate – The better the chocolate, the more luxurious your cookie cups will taste. Opt for high-quality milk or dark chocolate for the best results.
- Customize the Layers – Add a sprinkle of sea salt over the chocolate for a sweet and salty twist, or use dark chocolate for a richer flavor. You can even add a layer of crushed shortbread cookies under the caramel for extra texture.
These simple tips will help you create flawless Twix Cookie Cups that are as gorgeous as they are delicious!
Save this recipe on Pinterest for later!


Twix Cookie Cups
- Total Time: 27 minutes
- Yield: 12 cookie cups 1x
Description
Twix Cookie Cups are the ultimate treat for anyone who loves the iconic candy bar. These bite-sized delights feature a soft and buttery cookie base, a gooey caramel center, and a smooth, glossy chocolate topping. Perfect for parties, gifting, or simply satisfying your sweet tooth, these cookie cups are easy to make and absolutely irresistible!
Ingredients
- 1/2 cup unsalted butter, softened
- 1/4 cup granulated sugar
- 1/4 cup brown sugar, packed
- 1 tsp vanilla extract
- 1 cup all-purpose flour
- 1/4 tsp baking soda
- 1/8 tsp salt
- 20 soft caramels (or 1/2 cup caramel sauce)
- 2 tbsp heavy cream (optional, for melting caramels)
- 1/2 cup milk or dark chocolate, melted
Instructions
- Preheat your oven to 350°F (175°C). Lightly grease a mini muffin tin or line it with paper liners.
- In a large mixing bowl, cream together the softened butter, granulated sugar, and brown sugar until light and fluffy. Add the vanilla extract and mix until combined.
- Gradually add the flour, baking soda, and salt to the butter mixture. Stir until a soft dough forms.
- Scoop about a tablespoon of dough into each mini muffin cup. Press the dough into the bottom and slightly up the sides to create a cup shape.
- Bake for 10-12 minutes, or until the edges are lightly golden. Remove from the oven and immediately press down the centers using the back of a spoon or a small cup. Let cool completely in the tin.
- Melt the caramels with heavy cream (if using) in a microwave-safe bowl or over low heat on the stovetop. Stir until smooth. Fill each cookie cup with caramel, leaving a little space at the top.
- Melt the chocolate in a microwave-safe bowl in 20-second intervals, stirring after each. Spoon melted chocolate over the caramel layer, spreading it to cover the top completely.
- Allow the chocolate to set at room temperature or in the refrigerator. Once firm, gently remove the cookie cups from the tin and serve.
Notes
- Storage: Keep at room temperature for up to 3 days, refrigerate for up to a week, or freeze for up to 2 months.
- Variations: Add a sprinkle of sea salt for a sweet and salty twist, or substitute dark chocolate for a more intense flavor.
- Caramel Tip: If using store-bought caramels, melt them with heavy cream for a smoother consistency.
- Prep Time: 15 minutes
- Cook Time: 12 minutes