
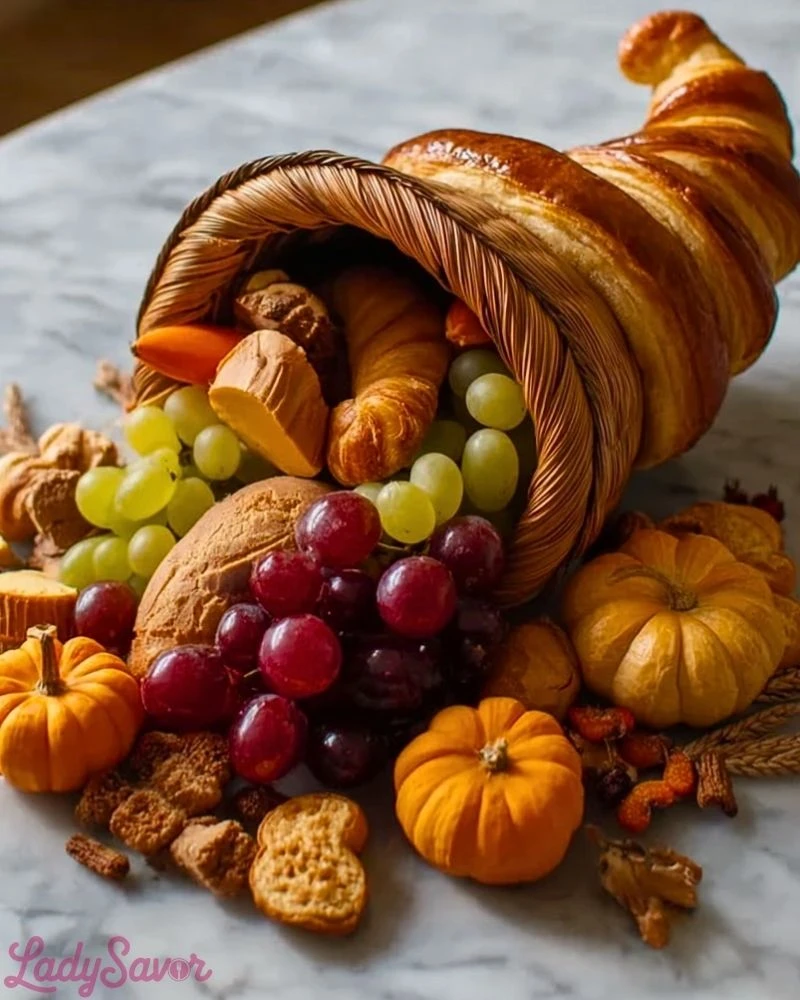
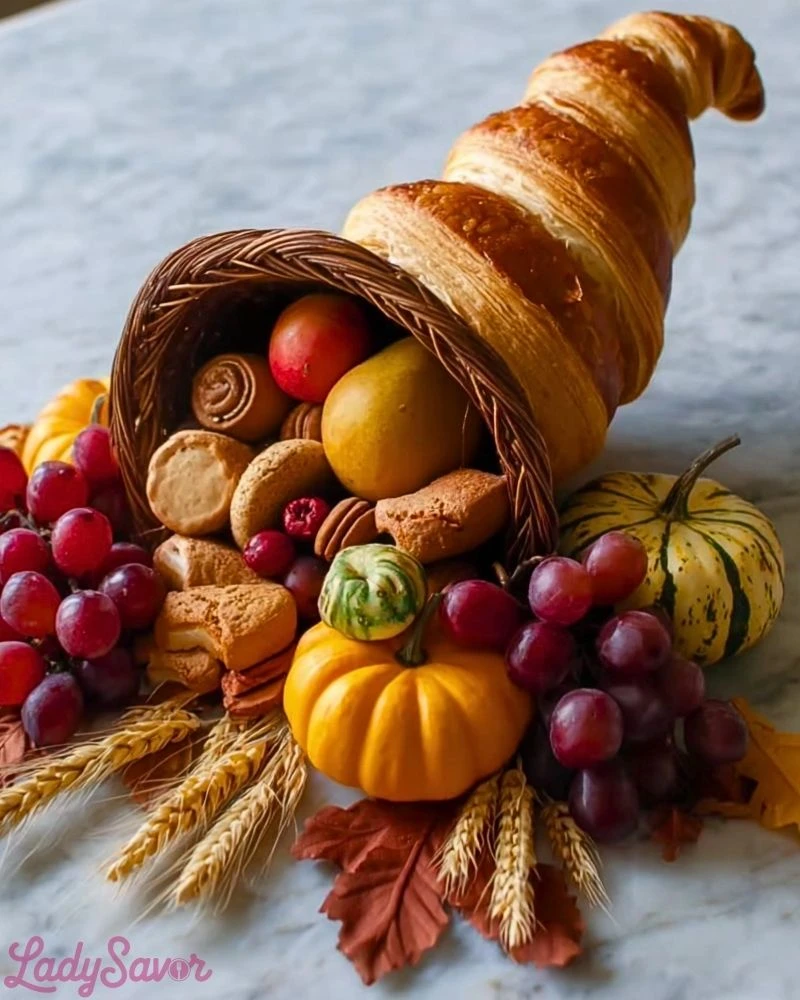
A Thanksgiving Cornucopia Centerpiece is more than just a decorative display—it’s a symbol of abundance, gratitude, and the beauty of the harvest season. Crafted from golden, flaky bread and filled with an array of seasonal delights like grapes, apples, mini pumpkins, dried fruits, and pastries, this edible centerpiece instantly brings warmth and festivity to your holiday table. It’s a showstopper that effortlessly blends tradition with creativity.
Whether you’re hosting a family feast or contributing to a Friendsgiving potluck, this cornucopia creates a visual and flavorful impact. It’s not only a feast for the eyes but also offers a delicious sampling of snacks, making it a practical and interactive decor piece. Plus, it invites guests to nibble and gather around, turning your table into the heart of your Thanksgiving celebration.
Why You’ll Love This Thanksgiving Cornucopia Centerpiece
- Combines beauty and function in one stunning display
- Easy to customize with your favorite fruits, nuts, crackers, and pastries
- A festive way to use edible materials for decor
- Impresses guests with minimal effort but maximum effect
- Perfect for photo-worthy tablescapes and family traditions
Preparation Phase & Tools to Use
To create this edible cornucopia, you’ll need a few essential kitchen tools and craft materials:
- Aluminum foil & oven-safe bowl or cone mold: These help form the classic horn shape during baking.
- Baking sheet: Supports the cornucopia as it bakes and ensures even browning.
- Pastry brush: Useful for applying egg wash to give the bread a golden finish.
- Rolling pin: Helps in evenly flattening the dough to wrap around the mold.
- Parchment paper: Prevents sticking and makes cleanup easy.
Each of these tools plays a vital role in shaping, baking, and presenting your cornucopia centerpiece.
Preparation Tips
Start with refrigerated bread dough or homemade yeast dough for best results—it’s easier to shape and holds structure well. Wrap the foil mold tightly and layer the dough strips with slight overlaps to ensure it holds together after baking. Apply egg wash before baking to enhance color and sheen. Let the cornucopia cool completely before filling to avoid wilting or melting any fruits or treats. When assembling, balance color and texture with a variety of items like grapes, dried fruits, crackers, nuts, and mini baked goods to make it visually appealing and snackable.
Ingredients for this Thanksgiving Cornucopia Centerpiece
For the Cornucopia Bread Shell:
- 2 cans refrigerated French bread dough (or homemade bread dough)
- 1 egg (for egg wash)
- 1 tablespoon water
- Aluminum foil (to shape the horn)
- Cooking spray or butter (to grease foil)
For the Filling:
- Red grapes (1 bunch)
- Green grapes (1 bunch)
- Mini apples or crabapples (2-3)
- Mini pumpkins or decorative gourds (2-3, optional for visual appeal)
- Dried apricots (1/2 cup)
- Dried cranberries (1/2 cup)
- Figs or dates (1/2 cup)
- Mixed nuts (1/2 cup, unshelled for presentation)
- Crackers (variety pack)
- Mini cinnamon rolls or baked pastries (4-6 small pieces)
- Cheese cubes (cheddar, gouda, or brie for optional edible addition)
You can adjust the ingredients based on personal preference or availability, using other fruits like pears, berries, or even small cookies.
Step 1: Build the Cornucopia Form
Create the base horn shape using crumpled aluminum foil. Start by shaping a cone (around 18 inches long) and curve the tail slightly. Wrap it in more foil until it’s sturdy, then spray or lightly butter the surface to prevent the dough from sticking.
Step 2: Prepare the Dough
Unroll the bread dough and cut into long strips (about 1 inch wide). Starting from the opening of the cone, wrap the strips around the foil mold, slightly overlapping each one. Continue spiraling down until you reach the tip. Pinch and tuck the ends to secure.
Step 3: Add Shine with Egg Wash
Whisk together the egg and a tablespoon of water. Use a pastry brush to coat the entire surface of the dough. This will help achieve a glossy, golden-brown finish when baked.
Step 4: Bake the Cornucopia
Place the wrapped form on a parchment-lined baking sheet. Bake at 375°F (190°C) for about 25–30 minutes or until golden brown. Keep an eye on the dough for even baking. You may need to rotate the pan halfway through.
Step 5: Cool and Remove the Mold
Once fully baked and golden, let the cornucopia cool on the baking sheet for at least 15–20 minutes. Gently remove the foil from the inside, taking care not to break the structure.
Step 6: Assemble the Filling
Begin by placing the larger items like mini pumpkins or apples at the back of the horn. Add bunches of grapes spilling outward to mimic a flowing effect. Fill gaps with dried fruits, crackers, and nuts, layering in cinnamon rolls or mini pastries toward the front. Create balance in colors, shapes, and textures for a full, rich appearance.
Step 7: Style and Serve
Position your cornucopia centerpiece on a large platter or directly on the table runner. Scatter a few extra snacks or fruits around its base to blend the display with your tablescape. Encourage guests to pick from the horn throughout the meal or use it as a pre-dinner grazing station.
Notes
This edible cornucopia is as flexible as it is festive. You can make it a day ahead and store it in a cool, dry place until ready to fill. For gatherings with kids, include fun treats like cookies or chocolates in the horn. If using homemade dough, allow enough rising time before shaping to avoid tearing. The bread horn is fully edible but can also be used purely as decoration—just fill it with sealed snacks or plastic fruits instead.
Watch Out for These Mistakes While Cooking
- Skipping the foil prep: If you don’t grease the foil well, the bread will stick and tear when removing the mold.
- Underlapping dough strips: Gaps between strips may cause the bread to separate or collapse after baking.
- Overbaking: Dry or overly dark crusts can occur if not monitored closely. Keep an eye on the oven.
- Filling while warm: Adding fruits or snacks too early can result in melting or soggy textures.
- Using too many moist fruits: Grapes and fresh berries should be balanced with dry items to prevent leaking or sogginess.
Storage Instructions
The baked cornucopia shell can be stored at room temperature for up to 2 days if kept dry and covered. Avoid refrigerating the bread shell, as it can become soft and lose crispness. If pre-filling, avoid adding perishable items too early—assemble shortly before serving. Leftover dried fruits, nuts, and crackers can be stored separately in airtight containers.
Estimated Nutrition
Note: Based on an average serving of decorative and snack items; values may vary.
- Calories: ~250 per serving (includes bread, fruit, and mixed snacks)
- Fat: 8g
- Saturated Fat: 2g
- Carbohydrates: 38g
- Sugar: 12g
- Fiber: 3g
- Protein: 6g
- Sodium: 320mg
Frequently Asked Questions
Can I make the cornucopia shell in advance?
Yes! Bake the shell up to 2 days ahead and store it in a dry, covered area until ready to fill.
What if I don’t have French bread dough?
You can use pizza dough, crescent roll dough, or make a simple yeast bread dough from scratch.
Is the bread cornucopia edible?
Absolutely. It’s a fully edible, delicious bread crust. However, it also works as a non-edible display piece if preferred.
How do I make the foil mold sturdy?
Use several layers of foil, wrapping tightly and shaping with your hands. Add a rolled-up towel or bowl inside for extra support during wrapping.
Can I add meats and cheeses to the filling?
Definitely. Add cured meats, cheese cubes, or even small cheese balls—just fill shortly before serving and keep chilled if needed.
Will the bread hold up with heavy fillings?
It’s best to keep heavier items like whole apples or pumpkins toward the back for balance. Don’t overload one area.
Can this be made gluten-free?
Yes. Use gluten-free dough and ensure all fillings are compliant. The shell may be more delicate but still doable.
How do I transport the cornucopia centerpiece?
Place the bread horn on a tray or cutting board. Pack the fillings separately, then assemble on-site to avoid tipping or breaking.
Conclusion
Creating a Thanksgiving Cornucopia Centerpiece is a rewarding way to celebrate the harvest season. It’s decorative, interactive, and totally customizable. Whether you’re crafting one for a big family gathering or a cozy dinner, this edible horn of plenty will add a memorable, festive touch to your holiday table. With the right tools and a bit of creativity, your centerpiece will be the talk of the celebration.
Thanksgiving Cornucopia Centerpiece
- Total Time: 1 hour
- Yield: 1 cornucopia centerpiece 1x
- Diet: Vegetarian
Description
Celebrate the season with this stunning Thanksgiving Cornucopia Centerpiece—a deliciously edible horn of plenty that doubles as festive decor. Made from golden baked bread dough and filled with an assortment of fresh fruits, nuts, crackers, and pastries, this quick and creative food idea is perfect for easy holiday entertaining. Whether you’re searching for Thanksgiving dinner ideas, an impressive party snack table, or a charming autumn DIY project, this centerpiece covers it all. Beautiful and practical, it’s an easy recipe that brings visual warmth and tasty surprises to your holiday table.
Ingredients
2 cans refrigerated French bread dough
1 egg
1 tablespoon water
Aluminum foil (for shaping)
Cooking spray or butter (to grease foil)
1 bunch red grapes
1 bunch green grapes
3 mini apples
2 mini pumpkins (optional)
0.5 cup dried apricots
0.5 cup dried cranberries
0.5 cup figs or dates
0.5 cup mixed nuts
1 cup assorted crackers
4 mini cinnamon rolls or pastries
1 cup cheese cubes (optional)
Instructions
1. Create a cone shape using aluminum foil about 18 inches long. Curve the end to resemble a cornucopia and ensure it’s sturdy. Grease the surface well.
2. Unroll bread dough and cut into 1-inch strips. Wrap strips around the cone form, overlapping slightly to ensure coverage and structure.
3. Whisk egg with water to make an egg wash. Brush the dough-covered mold for a golden finish.
4. Place the wrapped mold on a parchment-lined baking sheet. Bake at 375°F (190°C) for 25–30 minutes or until golden brown.
5. Let the cornucopia cool for 15–20 minutes, then gently remove the foil mold from inside.
6. Begin assembling by placing larger items like pumpkins and apples at the back of the cornucopia.
7. Layer in grapes, dried fruits, and crackers, letting them spill out naturally for visual appeal.
8. Add nuts, mini cinnamon rolls, and cheese cubes to fill in the gaps and complete the display.
9. Place your finished cornucopia on a tray or directly on the table for a stunning centerpiece.
10. Encourage guests to pick and snack as part of the meal or appetizer station.
Notes
Make sure the foil mold is well greased to avoid sticking when removing.
Let the bread shell cool completely before adding fruits or snacks.
Use a mix of textures and colors to enhance the presentation visually and nutritionally.
- Prep Time: 30 minutes
- Cook Time: 30 minutes
- Category: Appetizer / Holiday Display
- Method: Baking
- Cuisine: American
Nutrition
- Serving Size: 1 portion (1/10 of display)
- Calories: 250
- Sugar: 12g
- Sodium: 320mg
- Fat: 8g
- Saturated Fat: 2g
- Unsaturated Fat: 4g
- Trans Fat: 0g
- Carbohydrates: 38g
- Fiber: 3g
- Protein: 6g
- Cholesterol: 25mg