

Growing up, scalloped corn was one of those comforting dishes that always made an appearance at family gatherings, potlucks, and Sunday dinners. It’s warm, creamy, just the right amount of sweet, and topped with that golden, slightly crispy finish that practically begs you to grab a spoon. I’ve tried a few versions over the years, but nothing quite compares to this rich, baked blend of corn, buttery crackers, and just a hint of spice.
I love making scalloped corn because it’s simple, unfussy, and always gets rave reviews. It’s the kind of dish you don’t have to overthink — everything comes together in one pan, and it always feels like a cozy, nostalgic hug on a plate. Whether you’re making it as a holiday side or a weeknight treat, this one hits all the right notes.
Why You’ll Love This Scalloped Corn
Scalloped corn checks all the boxes for a perfect side dish: it’s creamy, savory, just a touch sweet, and wonderfully crunchy on top. It’s also incredibly easy to make and doesn’t require any complicated ingredients. Plus, it pairs beautifully with everything from roast chicken to grilled veggies. If you’re looking for a comfort dish that wins over everyone at the table — even the picky eaters — this one delivers every time.
What Kind of Corn Should I Use for Scalloped Corn?
You’ve got options here, and that’s one of the things I love about this dish. You can go with canned corn (drained), frozen corn (thawed), or even fresh corn cut straight from the cob if it’s in season. Canned cream-style corn is the secret ingredient that gives the dish its creamy consistency and subtle sweetness. I usually use a mix of both whole kernel corn and cream-style for the best texture and flavor combo. If you like a little bite in your dish, lean into whole corn; if you want extra creaminess, don’t skip the cream-style.
Options for Substitutions
This recipe is super flexible. Don’t be afraid to swap ingredients to suit your taste or pantry situation:
- No cream-style corn? Mix a little milk or heavy cream into regular corn with a splash of flour or cornstarch for thickness.
- Cracker crumbs can be swapped for breadcrumbs, crushed cornflakes, or even crumbled potato chips if you’re feeling bold.
- Eggs are there to bind the casserole, but you can use an egg substitute or leave one out if you’re okay with a softer texture.
- Dairy-free? Use plant-based butter and a creamy oat or soy milk alternative.
- Want some kick? Toss in a diced jalapeño or a pinch of cayenne pepper.
It’s one of those recipes you can tweak a dozen ways and still end up with something comforting and delicious.
Ingredients for This Scalloped Corn
- Whole Kernel Corn – Brings that signature pop of sweetness and texture to every bite. I love using canned or fresh if it’s in season.
- Cream-Style Corn – This is what gives scalloped corn its creamy, luscious consistency without needing to make a separate sauce.
- Eggs – These help bind everything together, making the casserole set up perfectly when baked.
- Milk – Adds moisture and creaminess, balancing out the thickness of the corn mixture.
- Butter – Melted butter deepens the flavor and adds that rich, savory undertone that makes the dish so comforting.
- Sugar – Just a small amount brings out the natural sweetness of the corn and rounds out the flavor.
- Salt & Pepper – Simple seasoning to enhance the dish without overpowering the corn’s flavor.
- Crushed Crackers (like Ritz) – These go into the mixture and also form the golden, buttery topping that gets crispy and toasty in the oven.
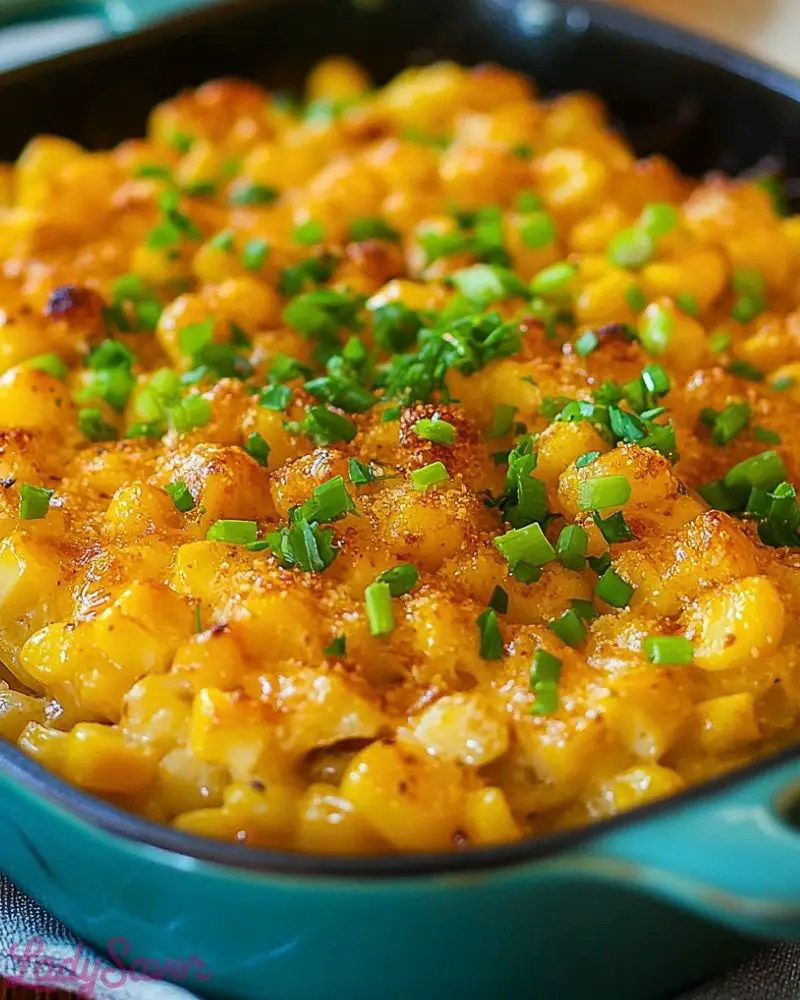
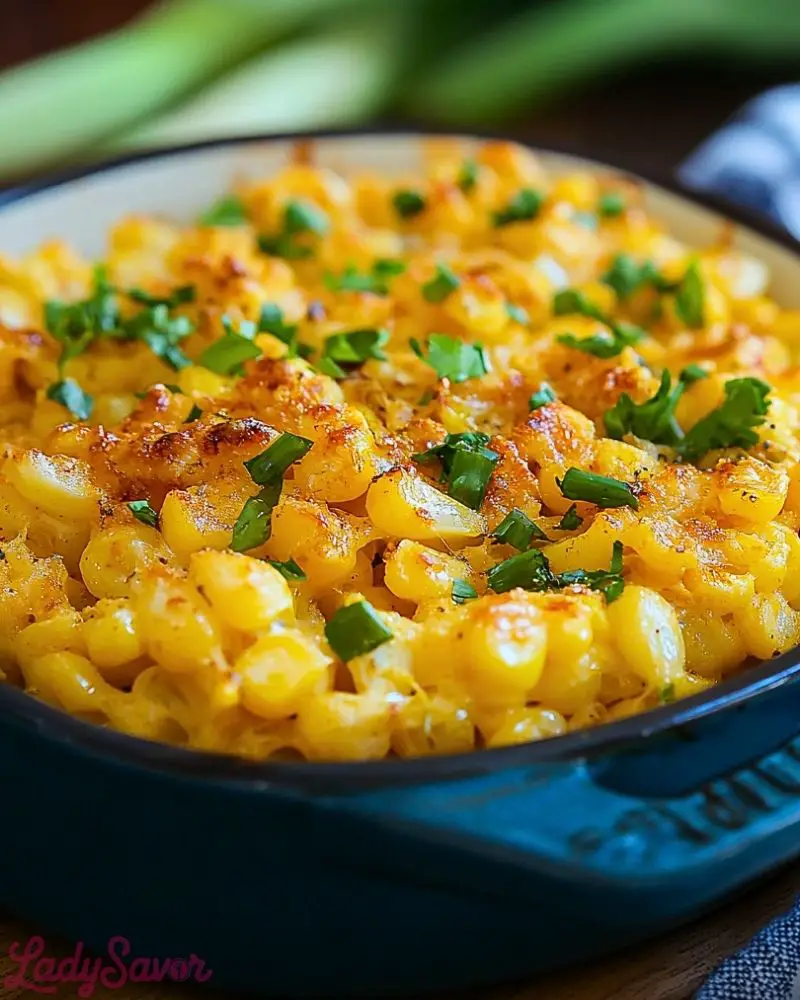
- Chives or Parsley (optional) – For a pop of color and a little fresh bite on top, they’re totally optional but look beautiful when serving.
Step 1: Prep Your Oven and Baking Dish
Preheat your oven to 350°F (175°C). Lightly grease a 9×9-inch baking dish or a similar-sized casserole dish with butter or non-stick spray. This helps prevent sticking and ensures a beautiful golden crust.
Step 2: Mix the Wet Ingredients
In a large mixing bowl, whisk together the eggs and milk until fully combined. Add the melted butter, sugar, salt, and pepper. This mixture will act as the creamy base that binds the whole dish together.
Step 3: Add the Corn
Stir in the whole kernel corn and cream-style corn into your wet mixture. Mix well so everything is evenly coated. The combo of these two types of corn gives you a balance of texture and creaminess.
Step 4: Fold in the Crackers
Gently fold in about 1 cup of crushed buttery crackers (like Ritz) into the corn mixture. These help absorb some of the liquid and add flavor throughout the dish.
Step 5: Pour and Top
Pour the corn mixture into your greased baking dish. Smooth out the top with a spatula. Then sprinkle an additional ½ cup of crushed crackers evenly over the top. Dot with a little extra butter if you want an extra golden, crisp topping.
Step 6: Bake
Place the dish in your preheated oven and bake for 40–45 minutes, or until the top is golden and the center is set. You’ll know it’s done when the edges are slightly browned and bubbling.
How Long to Cook the Scalloped Corn
Scalloped corn typically bakes for 40 to 45 minutes at 350°F (175°C). You want the center to be set — not jiggly — and the top to have a golden, crispy finish. If you’re using a deeper baking dish, it may need a few extra minutes. Keep an eye on the edges: once they start bubbling and the top looks nicely toasted, you’re good to go.
Tips for Perfect Scalloped Corn
- Drain Your Corn Well – If you’re using canned whole kernel corn, make sure to drain it fully or you’ll end up with a watery mixture.
- Don’t Overmix – Gently combine everything to avoid crushing the texture out of the corn and crackers.
- Use Room Temp Eggs – This helps everything blend more smoothly and evenly bake.
- Add a Butter Dot Topper – Dot a little extra butter over the top cracker layer for a deeply golden crust.
- Crush Crackers Lightly – You want a mix of fine crumbs and small chunks to create a nice texture contrast.
- Let It Sit Before Serving – Give it 5–10 minutes to rest after baking so it holds its shape better when scooping.
- Customize the Seasoning – Try a dash of smoked paprika or garlic powder for a little extra flavor.
- Double for a Crowd – This recipe doubles beautifully if you’re feeding a larger group or making it for a holiday.
Watch Out for These Mistakes While Cooking
- Using Only One Type of Corn – Skipping either the cream-style or whole kernel corn throws off the texture. You need both for that signature creamy-meets-crunchy bite.
- Too Much Liquid – Adding extra milk or using undrained corn can make the casserole soggy. Stick to the measured amounts.
- Not Letting It Bake Long Enough – If it’s underbaked, the center will be too soft and runny. Wait until it’s set and the top is golden.
- Skipping the Cracker Topping – That buttery, crispy layer is what makes scalloped corn irresistible. Don’t leave it out!
- Overbaking – Go too far, and you’ll dry it out. Check it at 40 minutes and only go longer if the center isn’t firm.
- Not Seasoning Enough – Corn is naturally sweet, but it still needs salt and pepper to balance it out.
- Crushing Crackers Too Fine – You want texture! A mix of crumbs and small pieces works best.
- Forgetting to Rest the Dish – Letting it sit after baking helps the casserole firm up, making it easier to serve.
What to Serve With Scalloped Corn?
Grilled or Roasted Meats
Think pork chops, roast chicken, or steak. The sweetness of the corn plays beautifully with savory, smoky meats.
Fried Chicken
Classic southern pairing — crispy on the outside, juicy on the inside, and perfectly balanced with creamy corn.
Glazed Carrots
The sweetness of both dishes works in harmony, and the carrots bring a nice contrasting texture.
Collard Greens or Spinach
The richness of scalloped corn pairs great with something leafy and slightly bitter.
Bacon-Wrapped Anything
From meatloaf to asparagus — the salty crunch of bacon is made even better with a creamy corn side.
Cornbread or Dinner Rolls
Mop up any creamy goodness with a soft roll or a slice of fluffy cornbread.
Baked Mac and Cheese
For the ultimate comfort plate, pair it with another cheesy favorite. No regrets.
Fresh Garden Salad
A crisp, acidic salad can lighten up the richness of the corn and refresh your palate.
Storage Instructions
Scalloped corn stores really well, making it a great make-ahead or leftover-friendly dish. Once cooled, transfer any leftovers to an airtight container and refrigerate for up to 4 days. Reheat in the microwave for a quick fix, or pop it in a 350°F oven for 10–15 minutes to bring back that crisp topping.
If you want to freeze it, place the cooled casserole in a freezer-safe dish or wrap tightly in foil. It’ll keep for about 2 months. Thaw overnight in the fridge before reheating. Just note: the topping may lose a bit of its crunch after freezing, but it’ll still be delicious.
Estimated Nutrition
Here’s an approximate breakdown for one serving (based on 8 servings total):
- Calories: 230
- Total Fat: 12g
- Saturated Fat: 6g
- Cholesterol: 60mg
- Sodium: 320mg
- Carbohydrates: 25g
- Fiber: 2g
- Sugars: 5g
- Protein: 5g
These values will vary depending on the exact brands and ingredients you use, especially with substitutions or extras like cheese or bacon.
Frequently Asked Questions
Can I make scalloped corn ahead of time?
Absolutely! You can prepare the mixture, pour it into the dish, and refrigerate it (unbaked) for up to 24 hours. Just add the topping right before baking.
Can I use fresh corn instead of canned?
Yes! About 3 to 4 ears of fresh corn will give you roughly the same amount as canned. Just cook it slightly before mixing it in for best texture.
What’s the difference between scalloped corn and corn casserole?
Scalloped corn is typically lighter and uses more eggs for structure, while corn casserole (like spoonbread) often includes corn muffin mix and has a thicker, almost pudding-like texture.
Can I make this gluten-free?
You sure can. Use gluten-free crackers or breadcrumbs, and double-check that your canned corn products don’t have any hidden gluten.
Do I have to use Ritz crackers?
Nope! You can use saltines, buttery breadcrumbs, cornflakes, or even crushed potato chips for a different twist.
How can I make this spicier?
Add diced jalapeños, a pinch of cayenne pepper, or even a few dashes of hot sauce into the corn mixture for a little heat.
Can I add cheese?
Yes, and it’s delicious! Stir in ½ to 1 cup of shredded cheddar or pepper jack into the mixture before baking for an extra creamy, cheesy kick.
What size dish should I use?
A 9×9-inch square dish works perfectly, but you can also use an 8×8 or any medium-sized casserole dish. Just avoid going too deep or it might need more time to bake.
Conclusion
Scalloped corn is one of those classic sides that always earns a spot at the table — comforting, creamy, and endlessly customizable. Whether you’re bringing it to a potluck or making it for a cozy dinner at home, it’s a guaranteed crowd-pleaser. Save this recipe on Pinterest, and don’t forget to share it with your family and friends. They’ll thank you later!

Scalloped Corn
- Total Time: 55 minutes
- Yield: 6–8 servings 1x
Description
Scalloped Corn is a creamy, comforting side dish made with sweet corn, eggs, crushed crackers, and buttery goodness. This easy baked casserole is perfect for holidays, potlucks, or weeknight dinners. A nostalgic favorite and family-loved recipe!
Ingredients
- 1 can (15 oz) whole kernel corn, drained
- 1 can (15 oz) cream-style corn
- 2 large eggs
- ½ cup milk
- ¼ cup unsalted butter, melted (plus more for topping)
- 1 tablespoon sugar
- ½ teaspoon salt
- ¼ teaspoon black pepper
- 1½ cups crushed buttery crackers (like Ritz), divided
- Chopped chives or parsley (optional, for garnish)
Instructions
- Preheat oven to 350°F (175°C) and grease a 9×9-inch baking dish.
- In a large bowl, whisk eggs and milk until combined.
- Add melted butter, sugar, salt, and pepper. Stir well.
- Mix in both whole kernel and cream-style corn.
- Fold in 1 cup of crushed crackers.
- Pour mixture into prepared dish and smooth the top.
- Sprinkle remaining ½ cup of crushed crackers on top. Dot with extra butter if desired.
- Bake for 40–45 minutes, until the top is golden and the center is set.
- Let rest for 5–10 minutes before serving. Garnish with chives or parsley, if using.
- Prep Time: 10 minutes
- Cook Time: 45 minutes