
Apple crisp has always been my favorite kind of comfort dessert. There’s just something magical about the way warm, tender apples melt into a brown sugar and oat topping that turns perfectly golden and crisp in the oven. And when it’s all topped with a scoop of vanilla ice cream? That’s dessert heaven. This recipe is the one I keep coming back to—it’s ridiculously simple, and the result is pure cozy indulgence every single time.
I’ve made this crisp for casual weeknight dinners, holiday gatherings, and even as a quick fix when I just needed a sweet treat. The smell alone, with cinnamon and nutmeg filling the kitchen, is enough to make anyone feel at home. What I love the most is how adaptable it is. Whether you’re working with fresh-picked apples from an orchard or ones that have been sitting in the fridge a little too long, this crisp transforms them into something truly special.
Why You’ll Love This Apple Crisp
This recipe is a dream for anyone who loves the combination of warm, spiced fruit and crunchy, buttery toppings. It’s easy enough for beginners but flavorful enough to impress even the pickiest dessert lovers. You don’t need fancy equipment or hard-to-find ingredients—just a bowl, a baking dish, and a craving for something delicious. The topping stays crispy even the next day, and the filling is never watery or too sweet. It’s all about balance.
What Kind of Apples Should I Use?
You can’t really go wrong with apples, but for the best flavor and texture, I prefer using a mix of tart and sweet varieties. Granny Smith gives a firm, tart bite that holds up well during baking, while something like Honeycrisp or Fuji brings in that natural sweetness and juiciness. If you’re short on time or variety, using just one kind will still give you great results.
Options for Substitutions
One of the things I love most about this apple crisp is how forgiving it is. Don’t have brown sugar? Use coconut sugar or maple syrup. Gluten-free? Swap the flour for almond flour or a gluten-free blend. Dairy-free? Plant-based butter works beautifully. And if you’re feeling adventurous, try pears or a mix of berries with the apples. The crisp topping works with almost any fruit base you can imagine.
Ingredients for this Apple Crisp
Apples – The star of the show. Use a mix of tart and sweet apples for depth of flavor and a balance between soft and firm textures after baking.
Old-Fashioned Rolled Oats – This gives the crisp topping its signature texture and slight chew. Instant oats won’t give you the same results.
All-Purpose Flour – Helps bind the topping and adds a bit of structure.
Brown Sugar – Adds a rich, molasses-like sweetness that pairs beautifully with the apples and spices.
Granulated Sugar – Used in the apple filling to enhance natural sweetness and help with caramelization.
Ground Cinnamon & Nutmeg – These warming spices are essential for that cozy fall flavor.
Salt – Just a pinch enhances all the flavors and keeps the dessert from being too sweet.
Unsalted Butter – Melted or softened, this makes the topping golden, rich, and deliciously crumbly.
Lemon Juice – Adds a fresh acidity to balance the sweetness of the apples and keep them from browning.
Vanilla Extract – Deepens the flavor of the apple filling with a warm, aromatic finish.
Step 1: Prep Your Apples
Peel, core, and slice 6–8 medium apples into 1/4-inch thick slices. Toss them with lemon juice, granulated sugar, cinnamon, nutmeg, and vanilla extract. This ensures every bite is flavorful and juicy.
Step 2: Make the Topping
In a mixing bowl, combine rolled oats, flour, brown sugar, cinnamon, salt, and melted butter. Stir until the mixture becomes crumbly and evenly coated. It should resemble wet sand with a few clumps.
Step 3: Assemble the Crisp
Preheat your oven to 350°F (175°C). Spread the apple mixture evenly in a greased 9×13-inch baking dish. Sprinkle the oat topping generously over the apples. Press down slightly to help it adhere.
Step 4: Bake
Bake uncovered for 40–45 minutes until the topping is golden brown and the apples are bubbling. If the topping starts browning too quickly, loosely tent the dish with foil for the last 10–15 minutes.
Step 5: Cool and Serve
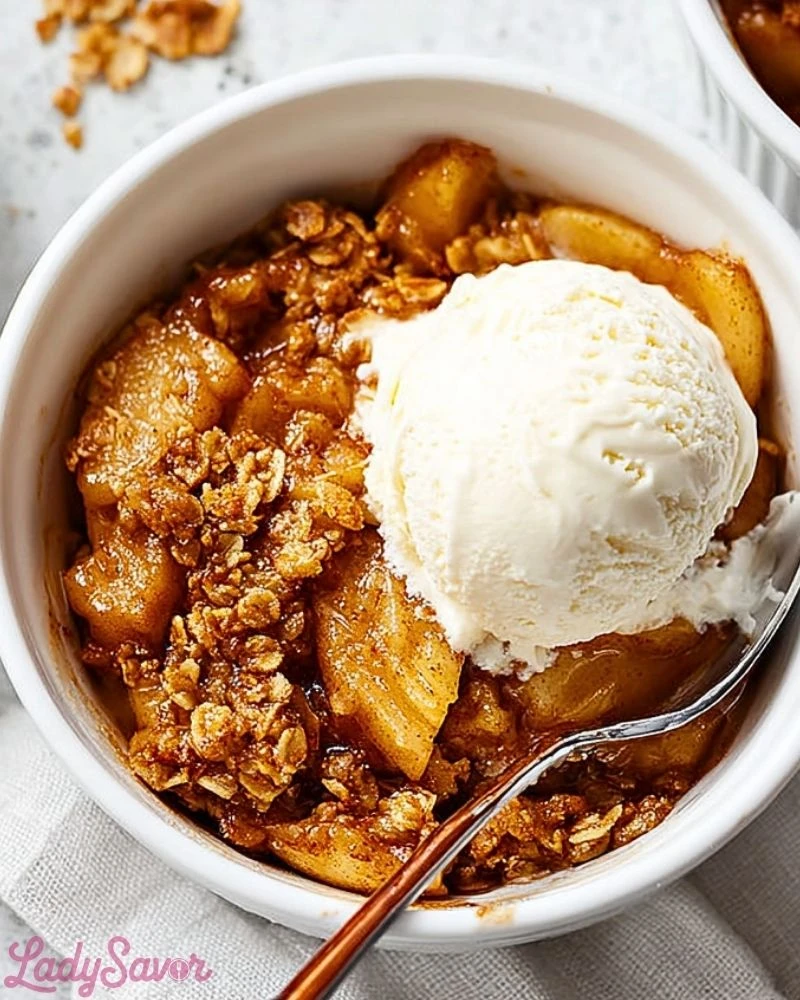
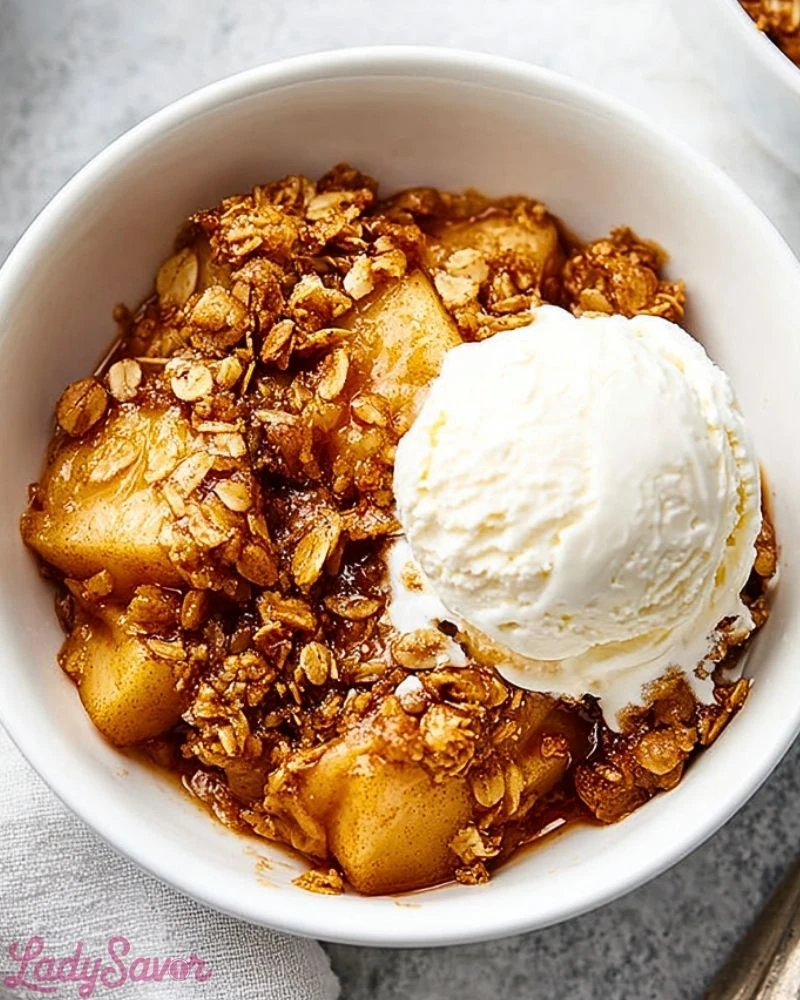
Let the apple crisp rest for at least 10–15 minutes before serving to allow the filling to thicken. Serve warm with a scoop of vanilla ice cream or a dollop of whipped cream for the ultimate cozy treat.
How Long to Prepare the Apple Crisp
Prep Time: Preparing the apples and mixing the topping takes about 20–25 minutes. Peeling and slicing apples can be a bit time-consuming, but if you have an apple peeler/corer, you’ll speed through it. The rest is just quick measuring and mixing.
Bake Time: The apple crisp bakes for 40–45 minutes at 350°F. Once it’s bubbling and golden on top, it’s done. Add an extra 5 minutes if you prefer a deeper caramelization in the topping. Let it cool for 10–15 minutes before serving.
Tips for Perfect Apple Crisp
- Use a mix of apples to add depth in flavor and texture.
- Cut the apple slices evenly so they cook uniformly.
- Don’t skip the lemon juice—it’s crucial for brightness.
- If you like an extra crispy topping, broil the crisp for 1–2 minutes at the end, watching carefully.
- Make ahead and reheat gently in the oven to retain the topping’s crispness.
Watch Out for These Mistakes While Cooking
- Using only one type of apple: You’ll miss out on the balance of tart and sweet.
- Over-mixing the topping: You want clumps, not a paste.
- Underbaking: The apples need time to soften and bubble.
- Too much sugar: Especially if using sweet apples—taste and adjust accordingly.
- Skipping the rest time: It allows the filling to set and prevents a runny mess.
What to Serve With Apple Crisp?
Vanilla Ice Cream
Classic and unbeatable. The contrast of warm crisp and cold ice cream is perfect.
Whipped Cream
Light and airy, whipped cream balances the richness of the dessert.
Salted Caramel Drizzle
Adds a deep, buttery sweetness with a hint of salt that elevates the whole dish.
Greek Yogurt
Great if you’re looking for a tangy, protein-packed topping for a lighter option.
Hot Apple Cider
Pair your crisp with a mug of cider for a warm, spiced dessert experience.
Storage Instructions
Refrigerator: Store leftovers in an airtight container in the fridge for up to 4 days. Reheat in the oven at 325°F for 10–15 minutes to keep the topping crisp. Microwave works too, but the topping may soften.
Freezer: Apple crisp can be frozen after baking. Let it cool completely, then wrap tightly and freeze for up to 3 months. To reheat, bake from frozen at 350°F for about 30–35 minutes.
Estimated Nutrition
(Per serving, approx.)
- Calories: 310
- Carbohydrates: 52g
- Protein: 2g
- Fat: 12g
- Saturated Fat: 7g
- Fiber: 4g
- Sugar: 34g
- Sodium: 90mg
Frequently Asked Questions
Can I make this apple crisp ahead of time?
Yes! You can assemble it ahead, refrigerate, and bake when ready. Let it sit at room temperature while the oven preheats.
Can I make it gluten-free?
Absolutely. Use a gluten-free flour blend and ensure your oats are certified gluten-free.
What apples are best for apple crisp?
A mix of Granny Smith and Honeycrisp or Fuji apples works best. It gives both structure and sweetness.
Can I reduce the sugar?
Yes. You can cut the sugar in both the filling and topping by 1/4 without affecting texture too much.
How do I know when it’s done baking?
The topping should be golden brown and the filling should be bubbling around the edges.
Conclusion
This Most Amazing Apple Crisp brings together all the elements of a classic comfort dessert—tender spiced apples, a crunchy oat topping, and that irresistible smell that fills the house. It’s easy to make, endlessly customizable, and guaranteed to please a crowd. Whether you’re making it for a holiday meal or just a cozy night in, this crisp will never disappoint.
Most Amazing Apple Crisp
- Total Time: 70 minutes
- Yield: 8 servings 1x
- Diet: Vegetarian
Description
Warm, cozy, and packed with sweet spiced apples, this Most Amazing Apple Crisp is the ultimate quick dessert. Whether you’re looking for an easy dinner dessert, a fall-inspired treat, or healthy-ish comfort food, this crisp checks every box. It’s made with simple pantry ingredients and delivers the perfect balance of juicy apples and buttery oat topping. Perfect for breakfast ideas, weeknight dinner ideas, or when you just need a foolproof easy recipe in your back pocket.
Ingredients
6 to 8 medium apples, peeled and sliced
1 tablespoon lemon juice
1/4 cup granulated sugar
1 teaspoon ground cinnamon
1/4 teaspoon ground nutmeg
1 teaspoon vanilla extract
1 cup old-fashioned rolled oats
3/4 cup all-purpose flour
2/3 cup brown sugar
1/2 teaspoon ground cinnamon (for topping)
1/4 teaspoon salt
1/2 cup unsalted butter, melted
Instructions
1. Preheat your oven to 350°F (175°C).
2. In a large bowl, toss apple slices with lemon juice, granulated sugar, cinnamon, nutmeg, and vanilla extract.
3. Spread the apples evenly in a greased 9×13-inch baking dish.
4. In another bowl, combine oats, flour, brown sugar, cinnamon, salt, and melted butter. Mix until crumbly.
5. Sprinkle topping evenly over the apples and press down gently.
6. Bake for 40–45 minutes or until the topping is golden and the apples are bubbling.
7. Let it cool for at least 10–15 minutes before serving.
8. Serve warm with vanilla ice cream or whipped cream.
Notes
Use a combination of tart and sweet apples for the best flavor.
Add chopped nuts like pecans or walnuts to the topping for extra crunch.
Reheat leftovers in the oven to restore crispness in the topping.
- Prep Time: 25 minutes
- Cook Time: 45 minutes
- Category: Dessert
- Method: Baking
- Cuisine: American
Nutrition
- Serving Size: 1 serving
- Calories: 310
- Sugar: 34g
- Sodium: 90mg
- Fat: 12g
- Saturated Fat: 7g
- Unsaturated Fat: 4g
- Trans Fat: 0g
- Carbohydrates: 52g
- Fiber: 4g
- Protein: 2g
- Cholesterol: 25mg