
I love recipes that feel playful and comforting at the same time, and Kit Kat Brownies always bring that kind of joy to my kitchen. The first time I made them, I wanted something richer than a basic brownie but still easy enough for a casual baking day. The crispy wafer layers and milk chocolate in Kit Kat bars add a fun twist that makes every bite more interesting.
What keeps me coming back to Kit Kat Brownies is how they balance fudgy texture with a little crunch. They taste familiar in the best way, like a classic brownie dressed up for a party, bake sale, or late-night dessert craving. I also like that they look impressive without asking for complicated steps or hard-to-find ingredients.
Why You’ll Love These Kit Kat Brownies
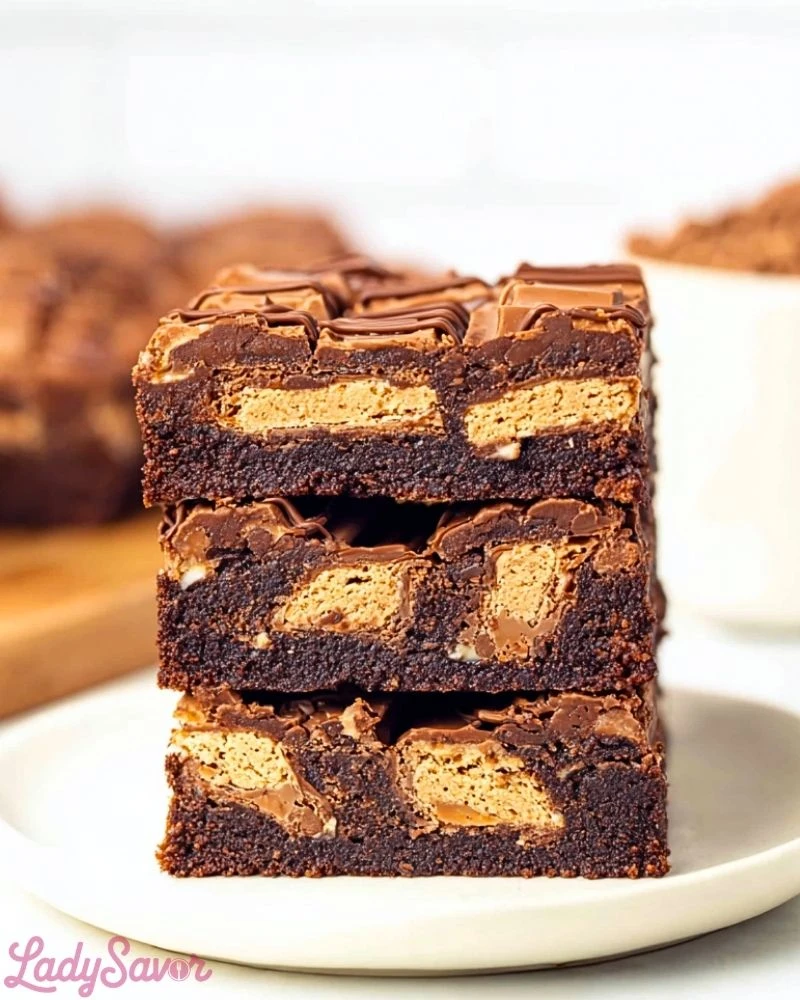
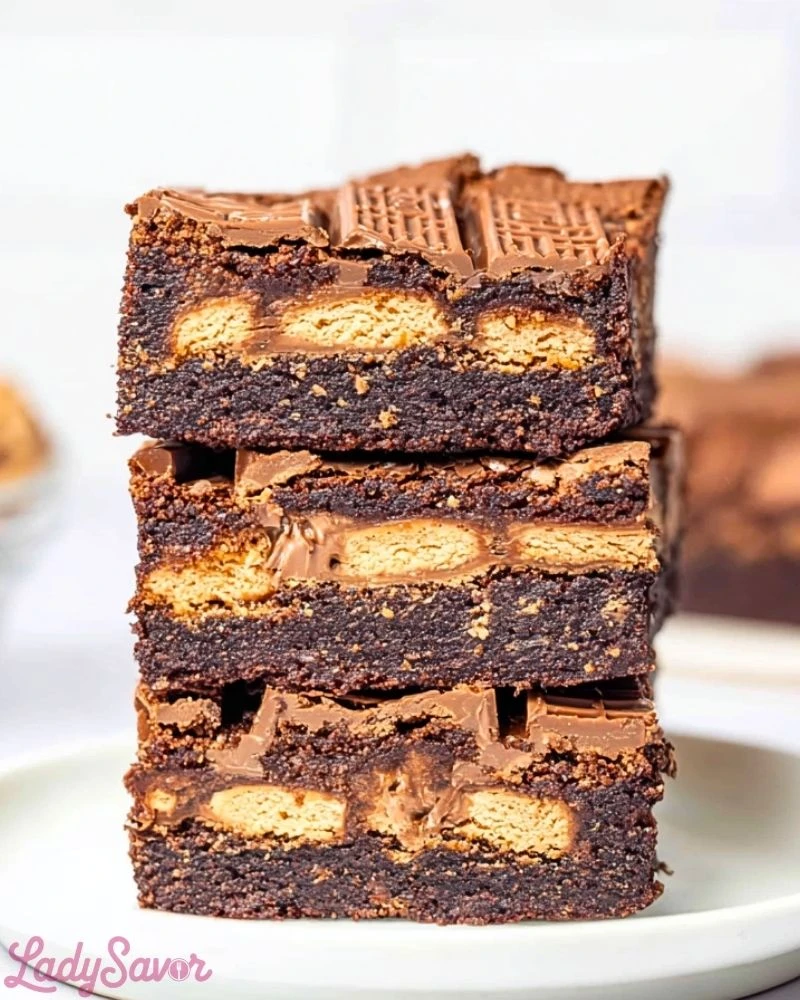
Kit Kat Brownies are the kind of dessert that win people over fast. The brownie base is rich, chocolatey, and soft, while the candy bars bring pockets of sweetness and a delicate crisp texture from the wafers. That contrast makes them feel more special than ordinary brownies.
I also appreciate how flexible they are for different occasions. You can bake them for birthdays, holidays, movie nights, or just because you want an easy dessert that feels a little extra. They are simple to slice, easy to share, and always a conversation starter when people spot the Kit Kat pieces tucked inside.
Another reason I love this recipe is that it works for both casual bakers and confident home cooks. You do not need advanced skills to get a delicious result, and the finished brownies still feel bakery-worthy.
What Kind of Chocolate Works Best in Kit Kat Brownies?
The best chocolate for Kit Kat Brownies depends on the flavor and texture you want in the final pan. I usually reach for semi-sweet chocolate in the brownie batter because it keeps the sweetness balanced, especially since Kit Kat bars already add quite a bit of sugary milk chocolate flavor.
If you prefer a deeper, more intense brownie, dark chocolate is a great choice. It gives the brownies a richer edge and helps the candy pieces stand out without making the dessert overly sweet. For a softer, sweeter finish, milk chocolate can work too, but the brownies may come out a little more candy-like overall.
Cocoa powder also matters. A good unsweetened cocoa powder adds depth and boosts the chocolate flavor without changing the texture too much. When paired with chopped Kit Kat bars, it creates that layered chocolate effect that makes these brownies so satisfying.
Options for Substitutions
If you need to adjust Kit Kat Brownies based on what you have at home, there are several easy swaps that still give you a delicious result. Standard Kit Kat bars can be replaced with mini Kit Kats, chocolate wafer bars, or even chopped chocolate-covered wafers if that is what you can find.
For the chocolate in the batter, you can use semi-sweet chips, chopped baking chocolate, or a mix of cocoa powder and melted butter depending on the style of brownie you like. If you want a more intense flavor, dark chocolate is an easy substitute.
Butter can often be swapped with a neutral baking oil for a slightly different texture, though I find butter gives the brownies better richness. Brown sugar can be used for part of the granulated sugar if you want a deeper, more caramel-like note.
If you need a flour alternative, a good measure-for-measure gluten-free flour blend can usually stand in for all-purpose flour. You can also switch the candy topping or mix-ins with chocolate chunks, peanut butter chips, or crushed cookies if you want a similar fun, loaded-brownie feel while keeping the spirit of Kit Kat Brownies.
Ingredients for this Kit Kat Brownies
Unsalted Butter
This is the base fat that gives the brownies their rich, moist texture and helps create that classic fudgy consistency.
Granulated Sugar
Sugar sweetens the brownies and contributes to the soft, slightly chewy structure while helping form that delicate top crust.
Brown Sugar
Adds moisture and a subtle caramel-like depth that makes the brownies taste more complex and indulgent.
Eggs
Eggs bind everything together and provide structure, while also adding richness and helping achieve that soft center.
Vanilla Extract
Enhances the chocolate flavor and adds a warm, comforting aroma to the brownies.
All-Purpose Flour
Gives the brownies structure. The amount used is key to keeping them fudgy rather than cakey.
Unsweetened Cocoa Powder
Deepens the chocolate flavor and gives the brownies their rich color and intensity.
Salt
Balances the sweetness and enhances all the other flavors in the recipe.
Semi-Sweet Chocolate (chips or chopped)
Melts into the batter for extra richness and pockets of gooey chocolate throughout.
Kit Kat Bars (chopped)
The star ingredient that adds crunch, sweetness, and a fun wafer texture contrast inside the brownies.
Optional: Chocolate Chips or Chunks
For extra bursts of chocolate in every bite, making the brownies even more indulgent.
Optional: Powdered Sugar (for topping)
A light dusting on top adds a simple decorative finish and a hint of extra sweetness.
Step 1: Prepare Your Baking Pan
Preheat your oven to 350°F (175°C). Line a square baking pan with parchment paper, leaving some overhang on the sides so you can easily lift the brownies out later. Lightly grease the paper to prevent sticking.
Step 2: Melt the Butter and Chocolate
In a heatproof bowl, melt the butter along with the semi-sweet chocolate. You can do this over a double boiler or in short intervals in the microwave, stirring frequently until smooth and glossy.
Step 3: Mix in the Sugars
Add both the granulated sugar and brown sugar to the melted mixture. Stir well until fully combined. The mixture should look thick and slightly grainy at this stage.
Step 4: Add Eggs and Vanilla
Crack in the eggs one at a time, mixing well after each addition. Stir in the vanilla extract. The batter will become smoother and slightly lighter in texture.
Step 5: Combine Dry Ingredients
In a separate bowl, whisk together the flour, cocoa powder, and salt. This helps distribute the cocoa evenly and prevents clumps.
Step 6: Fold Dry Ingredients into Batter
Gradually add the dry ingredients to the wet mixture. Gently fold everything together until just combined. Avoid overmixing, as this can make the brownies dense.
Step 7: Add Kit Kat Pieces
Fold in the chopped Kit Kat bars and any additional chocolate chips if using. Make sure they are evenly distributed throughout the batter.
Step 8: Transfer to Pan
Pour the batter into your prepared pan and spread it evenly. You can press a few extra Kit Kat pieces on top for a more decorative finish.
Step 9: Bake the Brownies
Place the pan in the oven and bake for about 25–30 minutes. The edges should be set while the center remains slightly soft for that fudgy texture.
Step 10: Cool Completely
Remove the brownies from the oven and allow them to cool completely in the pan. This step is important because it helps the brownies firm up and makes slicing easier.
Step 11: Slice and Serve
Lift the brownies out using the parchment paper, place them on a cutting board, and slice into squares or triangles. Dust with powdered sugar if desired and enjoy.
How Long to Prepare the Kit Kat Brownies
Making Kit Kat Brownies does not take as long as you might expect, which is one of the reasons I enjoy baking them so often. The preparation process, including gathering ingredients, melting chocolate, and mixing the batter, usually takes about 15 to 20 minutes. If you already have everything measured and ready, it can be even quicker.
The baking time typically ranges between 25 to 30 minutes, depending on your oven and how fudgy you like your brownies. After baking, allowing them to cool completely can take another 1 to 2 hours, but this step is essential for clean slicing and the perfect texture. In total, you are looking at around 1 hour 45 minutes from start to finish, including cooling time.
Tips for Perfect Kit Kat Brownies
Getting the perfect batch of Kit Kat Brownies comes down to a few small but important details. Always use room-temperature eggs, as they blend more smoothly into the batter and help create a consistent texture.
Do not overmix once you add the flour. Overmixing can lead to dense or tough brownies instead of the soft, fudgy texture you want. Stir just until everything is combined.
Use high-quality chocolate whenever possible. Since chocolate is the main flavor, better ingredients make a noticeable difference.
For extra texture, reserve a handful of Kit Kat pieces and press them gently into the top before baking. This not only looks great but also gives a slight crunch on the surface.
Let the brownies cool fully before slicing. It may be tempting to cut them early, but patience will reward you with cleaner edges and a better structure.
Watch Out for These Mistakes While Cooking
One common mistake is overbaking the brownies. If you wait until the center looks completely firm, they may turn out dry. The center should still be slightly soft when you remove them from the oven.
Another issue is using too much flour. Even a small excess can change the texture from fudgy to cakey, so it is best to measure carefully.
Skipping the parchment paper lining can make it difficult to remove the brownies cleanly from the pan, which may cause them to break apart.
Cutting the brownies while they are still warm often leads to messy, crumbly slices. Giving them enough time to set is key.
What to Serve With Kit Kat Brownies?
Vanilla Ice Cream
A scoop of vanilla ice cream pairs beautifully with the rich chocolate flavor and adds a creamy contrast.
Fresh Berries
Strawberries or raspberries bring a fresh, slightly tart balance that complements the sweetness of the brownies.
Whipped Cream
Light and airy whipped cream adds a soft texture and keeps the dessert from feeling too heavy.
Chocolate Sauce
Drizzling extra chocolate sauce over the brownies intensifies the chocolate experience for true chocolate lovers.
Coffee or Espresso
A warm cup of coffee or a shot of espresso cuts through the sweetness and rounds out the dessert perfectly.
Storage Instructions
To keep your Kit Kat Brownies fresh, store them in an airtight container at room temperature for up to 3 days. Make sure they are completely cooled before storing to prevent excess moisture from building up inside the container.
If you want to keep them longer, you can refrigerate them for up to a week. Just note that refrigeration may slightly firm up the texture, so letting them sit at room temperature for a few minutes before serving helps restore their softness.
For longer storage, these brownies freeze very well. Wrap individual pieces tightly in plastic wrap and place them in a freezer-safe container. They can be frozen for up to 2 months. When ready to enjoy, thaw them at room temperature or warm them slightly for that freshly baked feel.
Estimated Nutrition
Each serving of Kit Kat Brownies is rich and indulgent. On average, one piece contains approximately 250–320 calories, depending on portion size and added ingredients.
They also include carbohydrates from sugar and flour, fats from butter and chocolate, and small amounts of protein from eggs. While they are not meant to be a health food, they are perfect as an occasional treat.
Frequently Asked Questions
Can I use a boxed brownie mix instead?
Yes, you can use a boxed mix and simply fold in chopped Kit Kat bars to save time while still getting great flavor.
Can I make these brownies gluten-free?
Yes, substitute the all-purpose flour with a gluten-free baking blend that is designed for one-to-one replacement.
How do I know when the brownies are done?
Insert a toothpick into the center. It should come out with a few moist crumbs but not wet batter.
Can I add other mix-ins?
Absolutely. Nuts, caramel bits, or peanut butter chips can all be added for extra flavor and texture.
Why are my brownies too dry?
This usually happens from overbaking or adding too much flour. Be sure to measure carefully and keep an eye on baking time.
Conclusion
Kit Kat Brownies bring together everything I love in a dessert—rich chocolate flavor, a soft fudgy texture, and a playful crunch from the candy layers. They are easy to prepare, flexible to customize, and always a hit when shared.
Whether you are baking for a gathering or simply treating yourself, this recipe delivers a reliable and satisfying result every time. Once you try them, they are likely to become a regular favorite in your kitchen.
Kit Kat Brownies
- Total Time: 50 minutes
- Yield: 12 brownies 1x
- Diet: Vegetarian
Description
If you’re craving a rich, chocolatey dessert with a fun twist, these Kit Kat brownies are exactly what you need. This easy recipe combines fudgy brownies with crispy Kit Kat layers for the ultimate indulgent treat. Perfect as a quick dessert, easy dinner party idea, or sweet snack, these brownies deliver both texture and flavor in every bite.
Ingredients
1 cup unsalted butter
200 g dark or milk chocolate
1 cup granulated sugar
1/2 cup brown sugar
3 large eggs
1 tsp vanilla extract
1 cup all-purpose flour
1/4 cup cocoa powder
1/2 tsp salt
4–6 Kit Kat bars
1/2 cup chocolate chips
Instructions
1. Preheat your oven to 350°F (175°C) and line a square baking pan with parchment paper.
2. Melt the butter and chocolate together until smooth, then let it cool slightly.
3. Whisk together granulated sugar, brown sugar, and eggs until glossy.
4. Add vanilla extract and melted chocolate mixture, mixing well.
5. Sift in flour, cocoa powder, and salt, then fold gently.
6. Pour half the batter into the pan and spread evenly.
7. Layer Kit Kat bars across the batter.
8. Pour remaining batter over and spread gently.
9. Top with chocolate chips or extra Kit Kat pieces.
10. Bake for 25–35 minutes until edges are set and center is slightly soft.
11. Cool completely before slicing.
Notes
Use high-quality chocolate for best flavor.
Avoid overbaking to maintain a fudgy texture.
Cool completely before slicing for clean edges.
- Prep Time: 20 minutes
- Cook Time: 30 minutes
- Category: Dessert
- Method: Baking
- Cuisine: American
Nutrition
- Serving Size: 1 brownie
- Calories: 300
- Sugar: 22g
- Sodium: 120mg
- Fat: 18g
- Saturated Fat: 10g
- Unsaturated Fat: 6g
- Trans Fat: 0g
- Carbohydrates: 34g
- Fiber: 2g
- Protein: 4g
- Cholesterol: 55mg